
Blue Dragonfly TriumphPay Integration User Guide
TriumphPay Integration product page
Blue Dragonfly TriumphPay Integration imports TriumphPay invoice drafts into Business Central as applied vendor payments and matches each draft on bank reconciliations.
Process overview
Section titled “Process overview”After setup, each TriumphPay invoice draft goes through these tasks in this order:
- Fetch invoice drafts from TriumphPay.
- Review the invoices and credit notes in a draft.
- Import and apply a draft to the payment journal.
- Review the TriumphPay Log and the reconciliation report.
- Review and post the payment journal.
- Mark the draft as complete.
- Match the draft on a bank reconciliation.
Before you start
Section titled “Before you start”Assign permissions
Section titled “Assign permissions”Give users access to the TriumphPay pages and data.
Prerequisites: You can assign permission sets to users.
- Assign these three permission sets to each user who works with TriumphPay data:
| Permission set | App |
|---|---|
| BD TriumphPay Permissions | Blue Dragonfly TriumphPay Integration |
| APA PS BLD | Blue Dragonfly - AP Automation |
| Reg PS BLD | Blue Dragonfly Registration |
The users also need the standard Business Central permissions for payment journals, vendor ledger entries, and bank account reconciliations.
Result: The users can open the TriumphPay pages, run the TriumphPay actions, and write entries to the TriumphPay Log.
Connect Business Central to TriumphPay
Section titled “Connect Business Central to TriumphPay”Enter the TriumphPay API credentials and test the connection.
Prerequisites:
- The API Key and API Secret provided by TriumphPay.
- The email address and password of the dedicated TriumphPay user for API access.
Search for TriumphPay Setup and open the page. The fields are on the TriumphPay API Setup FastTab.
- In the API URL field, enter the TriumphPay API address. Required.
| TriumphPay environment | API URL |
|---|---|
| Onboarding (test) | https://api.onb-triumphpay.com |
| Production | https://api.triumphpay.com |
- In the API Key field, enter the API Key provided by TriumphPay. Required.
- In the API Secret field, enter the API Secret provided by TriumphPay. Required.
- Choose Yes when Business Central asks:
Are you sure you want to update the TriumphPay API Secret?
- In the User Email Address field, enter the email address of the TriumphPay API user. Required.
- In the User Password field, enter the password of the TriumphPay API user. Required.
- Choose Yes when Business Central asks:
Are you sure you want to update the TriumphPay User Password?
- Choose Authenticate Api Call.
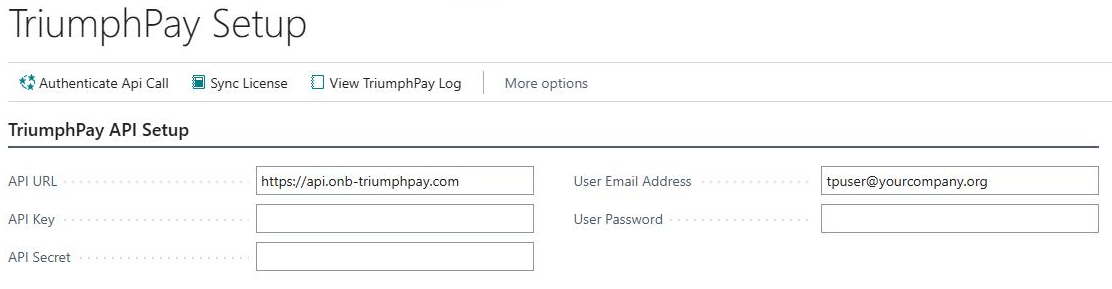
Result: Business Central shows this message:
API Authentication succeeded
If authentication fails, the message starts with “TriumphPay Api Connection Error:” and includes the text that TriumphPay returned. If the API Secret or User Password was never saved, the message names the missing value and ends with “not found”. Enter the value again and choose Yes at the confirmation question.
Choose the TriumphPay data to import
Section titled “Choose the TriumphPay data to import”Select which TriumphPay records are stored in Business Central and how payments are referenced.
Prerequisites: Connect Business Central to TriumphPay.
Search for TriumphPay Setup and open the page. The fields are on the Choose TriumphPay Data FastTab.
- Select Import TP Invoice Drafts. This is on by default and is required for all other import features.
- Select Import TP Invoices to store the invoices in each draft. On by default.
- Select Import TP Credit Notes to store the credit notes in each draft. On by default.
- In the Import Start Date field, enter the earliest draft date to fetch from TriumphPay.
- Choose Show more, and then select Use TriumphPay Reference Number only if your purchase invoices use the TriumphPay reference number as the Vendor Invoice No. Off by default.
- Select Allow Invoice Drafts Delete only if users must be able to delete drafts in Business Central. Off by default.

How each setting affects the import:
- Import TP Invoice Drafts: When this is off, no drafts are fetched, Import TP Invoices and Import TP Credit Notes are turned off, the other fields on this FastTab cannot be edited, and the Payment Journal Import Setup FastTab is hidden.
- Import TP Invoices: Each stored invoice becomes a payment line in the payment journal. When this is off, a draft is fetched without its invoices.
- Import TP Credit Notes: Each stored credit note becomes a credit memo line in the payment journal. When this is off, a draft is fetched without its credit notes.
- Import Start Date: Each fetch requests drafts dated from this date through tomorrow. If the field is blank, the fetch starts from yesterday. After a fetch that adds at least one new draft, the field is set to today.
- Use TriumphPay Reference Number: When this is off, each payment line’s Payment Reference is the TriumphPay Invoice Number (or Credit Note External Key for a credit note). When this is on, it is the Invoice Reference Number (or Credit Note Reference Number). The payment is applied to the posted purchase invoice whose Vendor Invoice No. equals the Payment Reference, so choose the value that your purchase invoices use. Business Central asks you to confirm the change:
This will impact TriumphPay transactions import and AP Apply transactions matching. Do you want to continue the change?
- Allow Invoice Drafts Delete: Turns on the Delete Invoice Draft action. See Delete a draft and fetch it again.
Result: The next fetch stores the selected TriumphPay data.
Set up payment journal import
Section titled “Set up payment journal import”Select the payment journal template, batch, bank account, payment type, and default dimensions for imported payment journal lines.
Prerequisites:
- Import TP Invoice Drafts is selected. See Choose the TriumphPay data to import.
- A payment journal template. Only templates of the Payments type can be selected.
- The bank account that TriumphPay drafts payments from.
- A No. Series on the payment journal template or batch. The Document No. of each imported line comes from the batch’s No. Series.
Search for TriumphPay Setup and open the page. The fields are on the Payment Journal Import Setup and Default Dimensions FastTabs.
- In the Payment Journal Template Name field, select the payment journal template for TriumphPay payments. Required.
- Select or clear Create New Journal Batch. On by default.
- If Create New Journal Batch is selected, enter up to three characters in the New Journal Batch Prefix field. The default is PMT.
- If Create New Journal Batch is cleared, select the batch in the Payment Journal Batch Name field.
- In the Balance Bank Account field, select the bank account that TriumphPay drafts payments from.
- Select or clear Default Payment Type.
- If Default Payment Type is selected, select the payment type in the Payment Type field.
- On the Default Dimensions FastTab, select Default Dimension 1 to add a global dimension 1 value to every imported line.
- In the field below Default Dimension 1, which shows the name of your global dimension 1, select the dimension value.
- Select Default Dimension 2 to add a global dimension 2 value to every imported line.
- In the field below Default Dimension 2, which shows the name of your global dimension 2, select the dimension value.

Choosing the batch setting:
- Create New Journal Batch selected: each draft is imported into its own batch. The batch name is the New Journal Batch Prefix followed by the invoice draft date with the date separators removed, in your date format. For example, a draft dated 10/07/24 with prefix PMT is imported into batch PMT100724. If that batch already contains lines from a different draft, a letter from A to Z is added, for example PMT100724A. New batches use the Balance Bank Account as the balancing account. Choose this setting to post and review each draft separately.
- Create New Journal Batch cleared: all drafts are imported into the batch in Payment Journal Batch Name. Choose this setting to post all TriumphPay payments from one batch. You cannot enter a Payment Journal Batch Name while Create New Journal Batch is selected.
Choosing the payment type setting:
- Default Payment Type cleared: the Bank Payment Type of each payment line is set from the TriumphPay Invoice Payout Destination. ACH sets Electronic Payment, check sets Manual Check, and wire leaves the field blank. Business Central requires Electronic Payment lines to be exported before the batch can be posted.
- Default Payment Type selected: every imported line gets the Payment Type you select. If you select Manual Check, the export is not required before posting.
Result: Imported lines are created in the selected template and batch with the selected bank account, payment type, and dimensions.
Set up automatic application of payments
Section titled “Set up automatic application of payments”Select how imported payment lines are applied to open vendor invoices.
Prerequisites: Set up payment journal import.
Search for TriumphPay Setup and open the page. The fields are on the AP Apply Configuration FastTab.
- Select one of the three settings below. The other two fields change automatically.
| To use this setting | Select | Fields after the change |
|---|---|---|
| Exact amount | Match Exact Amount Only | Match Exact Amount Only on, the other two off |
| Multiple invoices, full amounts only | Match with Multiple Invoices | Match with Multiple Invoices on, the other two off |
| Multiple invoices with partial payment (default) | Match Partial Payment | Match with Multiple Invoices and Match Partial Payment on, Match Exact Amount Only off |

How a payment line is matched: A payment line is applied only to open vendor ledger entries for the line’s vendor whose External Document No. equals the line’s Payment Reference. On a posted purchase invoice, this is the Vendor Invoice No. Open entries are used in order of due date, oldest first. An entry with a posting date later than the payment line’s posting date is not applied, and an error is written to the TriumphPay Log.
Choosing a setting:
- Match Exact Amount Only: the payment is applied only to an open invoice with exactly the same amount. Choose this setting when every TriumphPay payment pays one invoice in full.
- Match with Multiple Invoices: the payment is applied in full amounts to matching open invoices until the payment amount is used. An invoice larger than the remaining payment amount is not applied.
- Match Partial Payment: the same as Match with Multiple Invoices, but an invoice larger than the remaining payment amount is partly applied. Choose this setting when TriumphPay can pay part of an invoice, for example after an adjustment.
Result: Import and Apply Payment Journal applies payment lines with the selected setting.
Set up bank reconciliation matching tolerances
Section titled “Set up bank reconciliation matching tolerances”Select how far the bank statement amount and date may differ from the TriumphPay draft when Match TriumphPay runs.
Prerequisites: None.
Search for TriumphPay Setup and open the page. The fields are on the Bank Reconciliation Tolerance FastTab.
- Select Date Tolerance Allowed to accept a bank transaction date that differs from the draft’s posting date. On by default.
- In the Date Tolerance (in Days) field, enter the number of days the dates may differ. The default is 1.
- Select Amount Tolerance Allowed to accept a bank amount that differs from the draft total. On by default.
- In the Amount Tolerance field, enter the amount, in whole currency units, that the amounts may differ. The default is 1.

Choosing the tolerances: When a tolerance is turned off, the bank statement line must match exactly. When Date Tolerance Allowed is cleared, the bank statement line’s Transaction Date must fall within the posting dates of the draft’s payments. Use a date tolerance when your bank records the TriumphPay withdrawal on a different day than the draft date.
Result: Match TriumphPay uses these tolerances. See Match TriumphPay drafts on a bank reconciliation.
Fetch invoice drafts from TriumphPay
Section titled “Fetch invoice drafts from TriumphPay”Copy new TriumphPay invoice drafts, with their invoices and credit notes, into Business Central.
Prerequisites:
- Connect Business Central to TriumphPay.
- Choose the TriumphPay data to import.
- Before the first fetch, check the Import Start Date on the TriumphPay Setup page.
Search for TriumphPay Invoice Drafts and open the page. The page shows drafts with Status Open.
- Choose Fetch TriumphPay Invoice Drafts.
- If Business Central asks whether to allow the extension to make an external request, choose Allow Always.
- Read the message, and then choose OK.
Result: Business Central shows a message with the number of new drafts:
2 Invoice Drafts read. Please review log for details
Each new draft appears in the list with Status Open. If at least one new draft was added, the Import Start Date on the TriumphPay Setup page is set to today.
A draft whose Invoice Draft Id already exists in Business Central is not fetched again. The TriumphPay Log shows an error entry for it, which is expected when date ranges overlap:
TriumphPay Invoice Draft - [Invoice Draft Id] already exists
If TriumphPay has no drafts in the date range, Business Central shows:
TriumphPay returned 0 Invoice Drafts for current filters
Review the invoices and credit notes in a draft
Section titled “Review the invoices and credit notes in a draft”Check that the TriumphPay invoices and credit notes were stored and see the values used for the payment journal.
Prerequisites: Fetch invoice drafts from TriumphPay.
Search for TriumphPay Invoice Drafts and open the page.
- Select the draft row.
- Compare Invoice Draft Invoices, the number of invoices TriumphPay reports, with Invoice Draft Invoices BC, the number stored in Business Central.
- Compare Invoice Draft Credit Notes with Invoice Draft Credit Notes BC in the same way.
- Choose the number in Invoice Draft Invoices BC. The TriumphPay Invoices page opens with the draft’s invoices.
- Review the invoice columns in the table below, and then close the page.
- Choose the number in Invoice Draft Credit Notes BC. The TriumphPay Credit Notes page opens with the draft’s credit notes.
- To see the invoices a credit note is applied to in TriumphPay, choose the number in Credit Note Applications. The TriumphPay Applications page opens.
| Column on TriumphPay Invoices | Used for |
|---|---|
| Invoice External Payee Key | The vendor. It must equal the No. of a Business Central vendor. |
| Invoice Number | The Payment Reference, unless Use TriumphPay Reference Number is selected |
| Invoice Reference Number | The Payment Reference when Use TriumphPay Reference Number is selected |
| Invoice Gross Amount | The payment amount |
| Invoice Actual Draft Date | The posting date |
| Invoice Payout Destination | The Bank Payment Type, unless Default Payment Type is selected |
Result: You have confirmed that the draft’s invoices and credit notes are stored. If Invoice Draft Invoices BC is 0 while Invoice Draft Invoices is greater than 0, the invoices were not stored, for example because the draft was fetched while Import TP Invoices was cleared. To fetch the draft again, see Delete a draft and fetch it again.
Import and apply a draft to the payment journal
Section titled “Import and apply a draft to the payment journal”Create payment journal lines for a draft’s invoices and credit notes and apply them to open vendor invoices.
Prerequisites:
- The payment journal and apply setup tasks are complete.
- Each TriumphPay Invoice External Payee Key and Credit Note External Payee Key equals the No. of a Business Central vendor.
- Each invoice to be paid is posted, and its Vendor Invoice No. equals the TriumphPay Invoice Number, or the Invoice Reference Number when Use TriumphPay Reference Number is selected.
- The draft’s Status is Open.
Search for TriumphPay Invoice Drafts and open the page.
- Select the draft row.
- Choose Import and Apply Payment Journal.
- Read the message, and then choose OK.
Result: Business Central creates a payment line for each invoice and a credit memo line for each credit note, and applies each line. When all lines were created and applied, Business Central shows:
Payment Journal(s) imported and applied successfully. Please review TriumphPay Log for details
When a line could not be created or applied, Business Central shows the following message. See Review the TriumphPay Log.
Some issues were found when applying Payment Journal. Please review TriumphPay Log for details
The journal lines are filled in as follows:
| Payment journal field | Payment line (invoice) | Credit memo line (credit note) |
|---|---|---|
| Document Type | Payment | Credit Memo |
| Account Type | Vendor | Vendor |
| Account No. | Invoice External Payee Key | Credit Note External Payee Key |
| Posting Date | Invoice Actual Draft Date | Credit Note Credit Date |
| Document Date | Invoice Actual Paid Date | Credit Note Paid In Full Date |
| Document No. | Next number from the batch’s No. Series | Next number from the batch’s No. Series |
| Description | Invoice Payee Company Name | Credit Note Payee Company Name |
| External Document No. | The draft’s Invoice Draft Id | The draft’s Invoice Draft Id |
| Payment Reference | Invoice Number, or Invoice Reference Number | Credit Note External Key, or Credit Note Reference Number |
| Amount | Invoice Gross Amount | Credit Note Gross Amount |
| Bal. Account Type | Bank Account | Bank Account |
| Bal. Account No. | Balance Bank Account | Balance Bank Account |
| Bank Payment Type | From Invoice Payout Destination, or Payment Type when Default Payment Type is selected | Payment Type when Default Payment Type is selected |
| Global dimension 1 and 2 | The default dimension values, when selected | The default dimension values, when selected |
A line that already exists in an unposted payment journal for the same draft and Payment Reference is not created again. You can run Import and Apply Payment Journal again for the same draft after you correct a problem. Missing lines are created, and the apply step runs again for all of the draft’s journal lines. Lines that are already fully applied are logged as errors with the description “Payment of [amount] is already applied as [document number]”, so the result message is “Some issues were found when applying Payment Journal” even when the correction worked. Check the log entries for the lines you corrected.
Review the TriumphPay Log
Section titled “Review the TriumphPay Log”Find the cause of a fetch, import, apply, or matching problem.
Prerequisites: None.
Search for TriumphPay Invoice Drafts and open the page.
- Choose View TriumphPay Log. You can also choose View TriumphPay Log on the TriumphPay Setup page, or search for TriumphPay Log.
- Review the Log Description of each entry.
- To see all entries, remove the filters on Log Type and Log DateTime.
Result: The TriumphPay Log opens filtered to entries with Log Type Error from today onward. The other Log Type values are Information and Warning. Each entry shows Log DateTime, Log Type, Log Action, Log Description, and Log User Full Name, with the newest entry first.
Common error entries and what to do:
| Log Description | What to do |
|---|---|
| Vendor - [vendor number] not found for Payment - [payment reference] | Create the vendor with this No., or correct the payee in TriumphPay. Then run Import and Apply Payment Journal again. |
| No open invoice [payment reference] of vendor [vendor number] was found to apply payment [document number] from batch [batch name] | Post the purchase invoice with this Vendor Invoice No., or check whether it is already paid. Then run Import and Apply Payment Journal again. |
| You cannot apply and post [document type] [document number] on [document type] [document number] for vendor [vendor number] with an earlier posting date | The invoice’s posting date is later than the payment’s posting date. Correct the dates before you post. |
| The setup is configured to apply payment amount with the same amount on invoice. Please review | Match Exact Amount Only is selected and part of the payment line is already applied. Review the line’s applications with Apply Entries on the Payment Journals page. |
| Payment of [amount] is already applied as [document number] | No action if you ran Import and Apply Payment Journal again for the draft. The line was already applied. |
| TriumphPay Invoice Draft - [Invoice Draft Id] already exists | No action. The draft was fetched before. |
Review the reconciliation report for a draft
Section titled “Review the reconciliation report for a draft”See the payment journal lines and posted vendor entries for a draft and the invoices they are applied to.
Prerequisites: Import and apply a draft to the payment journal.
Search for TriumphPay Invoice Drafts and open the page.
- Select the draft row.
- Choose Reconciliation Report. The TriumphPay Reconciliation List page opens for the selected draft.
- Review the rows. Use the Posted column to tell unposted lines from posted entries.
- To show a different draft, choose Reconcile TriumphPay Draft.
- In the TriumphPay Imported Data Reconciliation window, enter the Invoice Draft Id of the draft. Required.
- Choose OK.
Result: The list shows one row for each payment or credit memo whose External Document No. equals the draft ID:
- Posted No: an unposted payment journal line. The Applied Document Number, Applied Document Date, Applied External Document Number, and Applied Amount columns show the open invoice the line is applied to.
- Posted Yes: a posted vendor ledger entry. The applied columns show the invoice entry it was applied to.
The other columns are Draft ID, Vendor Number, Document Number, Document Type, and Posting Date. If no draft ID is entered, Business Central shows:
Please select a draft to reconcile.
Review and post the payment journal
Section titled “Review and post the payment journal”Check the applications in the imported batch and post it.
Prerequisites: Import and apply a draft to the payment journal.
- Search for Payment Journals and open the page.
- Select the batch the draft was imported into. See the batch name rules in Set up payment journal import.
- Select a payment line.
- Choose Apply Entries to see the vendor entries the line is applied to.
- Close the Apply Entries page.
- Post the batch.
Result: The payments and credit memos are posted and applied to the vendor invoices. The payments are posted to the Balance Bank Account. Next, mark the draft as complete.
Mark a draft as complete
Section titled “Mark a draft as complete”Record that all of a draft’s payments are imported, applied, and posted, and prevent the draft from being imported again.
Prerequisites: Review and post the payment journal.
Search for TriumphPay Invoice Drafts and open the page.
- Select the draft row.
- Choose Complete. You can also press Ctrl+F9.
Result: Business Central shows this message:
Invoice Draft - [Invoice Draft Id] is marked as Completed
The draft’s Status is Completed, and the draft is no longer shown, because the page shows drafts with Status Open. The status change is written to the TriumphPay Log.
Match TriumphPay drafts on a bank reconciliation
Section titled “Match TriumphPay drafts on a bank reconciliation”Match the bank withdrawal for each TriumphPay draft with the draft’s posted payments.
Prerequisites:
- The draft’s payment journal is posted. See Review and post the payment journal.
- A bank account reconciliation for the Balance Bank Account, with the bank statement lines.
- Set up bank reconciliation matching tolerances.
Search for Bank Account Reconciliations and open the reconciliation for the bank account.
- Choose Matching.
- Choose Match TriumphPay.
- Read the message, and then choose OK.
Result: The open bank account ledger entries are grouped by External Document No., which is the Invoice Draft Id for TriumphPay payments, and each group is totaled. Each total is matched to one bank statement line that meets three conditions:
- Its Statement Amount equals the total, within the Amount Tolerance.
- Its Applied Amount is 0.
- Its Transaction Date is within the posting dates of the group, extended by the Date Tolerance (in Days).
When every group is matched, Business Central shows:
Bank Account Transactions Reconciliation completed
Otherwise, it shows the following message. The TriumphPay Log lists each group and whether it was matched, as entries with Log Type Information. Remove the Log Type filter to see them.
Bank Account Transactions Reconciliation completed with some discrepancies. Please review TriumphPay Log for details
Reopen a completed draft
Section titled “Reopen a completed draft”Change a draft’s Status back to Open so that it can be imported and applied again.
Prerequisites: The draft’s Status is Completed.
Search for TriumphPay Invoice Drafts and open the page.
- Remove the Status filter to show completed drafts.
- Select the draft row.
- Choose the arrow next to Complete.
- Choose Reopen.
Result: Business Central shows this message:
Invoice Draft - [Invoice Draft Id] is marked as Open
Delete a draft and fetch it again
Section titled “Delete a draft and fetch it again”Remove a draft from Business Central and fetch the current version from TriumphPay.
Prerequisites: Allow Invoice Drafts Delete is selected on the TriumphPay Setup page.
Search for TriumphPay Invoice Drafts and open the page.
- Select the draft row.
- Choose Delete Invoice Draft.
- Choose Yes when Business Central asks:
Are you sure you want to delete the invoice draft - [Invoice Draft Id] ?
- Search for TriumphPay Setup and open the page.
- In the Import Start Date field, enter the draft’s date or an earlier date.
- Search for TriumphPay Invoice Drafts and open the page.
- Choose Fetch TriumphPay Invoice Drafts.
Result: After step 3, Business Central shows the following message. The draft and its stored invoices, credit notes, and applications are removed from Business Central. TriumphPay is not changed.
Invoice Draft - [Invoice Draft Id] is deleted
After step 7, the draft is fetched again with Status Open. Drafts that were not deleted are not fetched again. If Allow Invoice Drafts Delete is cleared, Business Central shows:
Invoice Draft delete is not enable. Please contact administrator
Sync the license
Section titled “Sync the license”Apply a license renewal or trial extension from Blue Dragonfly immediately.
Prerequisites: Blue Dragonfly has renewed or updated your license, for example by extending an expired trial.
Search for TriumphPay Setup and open the page.
- Choose Sync License.

Result: The license information in Business Central is refreshed, including the license expiration date.