Corporate Direct Debit BAI2 Import User Guide
1. How the Process Works
Section titled “1. How the Process Works”This extension takes a BAI2 bank file containing corporate direct debit (and related outbound) transactions and turns the matched payments into vendor payment journal lines, ready for you to post in Business Central.
The process runs in five stages. Each stage is described in detail in the sections that follow.
-
Import. You upload a BAI2 file. The extension stores the file, checks it is not a duplicate, and parses it into one import line per debit transaction. Each line is classified by its BAI2 transaction type code, and the remittance text is parsed to extract the originator name, reference, and company ID. After parsing, the import status is Parsed.
-
Validate. The extension matches each line to a vendor, then to an open vendor invoice. The result of matching is recorded on each line as a Validation Status. When validation has run, the import status becomes Validated.
-
Resolve exceptions. Any line that did not match cleanly is flagged. You correct it by selecting a vendor or invoice manually, by excluding it, or by re-running validation after you fix the underlying data.
-
Create payment journal lines. Lines with a Valid status are transferred to a payment journal batch as vendor payment lines, each applied to its matched invoice. The import status becomes Transferred.
-
Post. You post the payment journal using the standard Business Central posting routine.
The import keeps a record of every file you bring in, with statistics on transaction counts and amounts, so you can audit what was imported and when.
2. One-Time Setup
Section titled “2. One-Time Setup”Goal: Configure the defaults that control vendor matching, invoice matching, and the payment method applied to generated journal lines.
Prerequisites:
- The BAI2 Import permission set assigned to your user.
- At least one Payments-type general journal template and batch, if you intend to record a default.
Steps:
- Choose the Tell Me icon, enter Corporate Direct Debit BAI2 Import Setup, and open the page.
- The page opens on the single setup record. Choose the edit (pencil) icon to make changes.
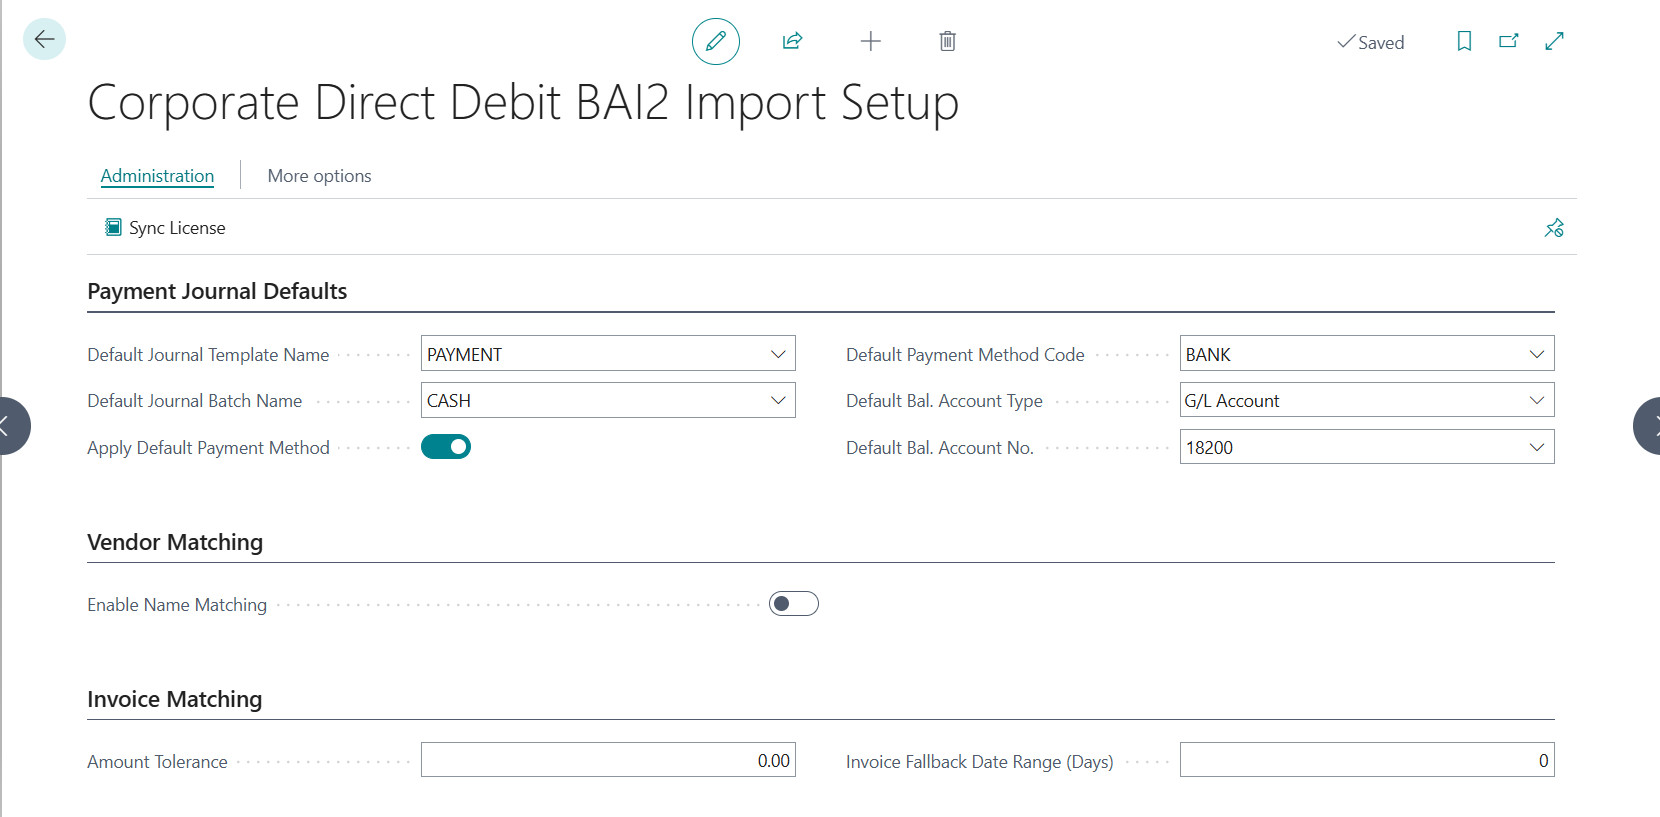
Payment Journal Defaults
Section titled “Payment Journal Defaults”- Default Journal Template Name. The Payments-type general journal template you want associated with this import. Only templates of type Payments can be selected.
- Default Journal Batch Name. The batch within that template. Clearing the template clears the batch.
- Apply Default Payment Method. When turned on, every payment journal line created from an import is assigned the Default Payment Method Code. Turn it off to leave the Payment Method Code blank on the generated lines so it follows the vendor’s own default.
- Default Payment Method Code. The payment method code applied to each generated line. This field is enabled only when Apply Default Payment Method is on.
- Default Bal. Account Type. Whether the balancing account applied to generated payment journal lines is a G/L Account or a Bank Account. Changing the type clears any value already entered in Default Bal. Account No.
- Default Bal. Account No. The balancing account applied to each payment journal line created from a BAI2 import. The lookup lists bank accounts when the type is Bank Account, or posting G/L accounts that allow direct posting when the type is G/L Account. Leave this blank to leave the balancing account empty on the generated lines, so each line carries no balancing account of its own.
Vendor Matching
Section titled “Vendor Matching”- Enable Name Matching. Controls whether vendor matching is allowed to fall back to the vendor name and search name when no vendor is found by company ID.
- Off (recommended for accuracy): A vendor is matched only by company ID. If no company-ID match exists, the line is flagged Vendor Not Found for manual review. This prevents an incorrect name-based match.
- On: When no company-ID match exists, the extension also tries an exact normalized match on the vendor Name, then the vendor Search Name, then a single partial name match. Use this only if your vendor company IDs are not reliably populated, and expect more lines to land in Multiple Vendors review.
Invoice Matching
Section titled “Invoice Matching”- Amount Tolerance. The largest allowed difference between an open invoice’s remaining amount and the imported payment amount for the line to count as a match. A difference greater than this flags the line as Amount Mismatch. Set it to a small value such as
0.01to require an effectively exact match, or raise it to absorb minor rounding or fee differences. Defaults to0.01when left blank. - Invoice Fallback Date Range (Days). The number of days, counted back from today, used by the amount-based fallback. When a transaction carries no invoice reference (for example a CTX payment), the extension matches by vendor and exact amount among open invoices dated within this window, and applies the payment to the latest qualifying invoice. A wider range catches older invoices but raises the chance of an ambiguous match. Defaults to
14when left blank.
Expected result: The setup record is saved and is used by every subsequent import and validation run.
3. Step 1: Import a BAI2 File
Section titled “3. Step 1: Import a BAI2 File”Goal: Upload a BAI2 file and parse it into staged import lines.
Prerequisites:
- The BAI2 Import permission set.
- A BAI2 file (
.baior.bai2) from your bank.
Steps:
- Choose the Tell Me icon, enter Corporate Direct Debit BAI2 Import, and open the list.

- Choose Import New File.
- In the file dialog, select your BAI2 file and confirm.
- The file is uploaded and parsed, and the Corporate Direct Debit BAI2 Import Card opens on the new import.
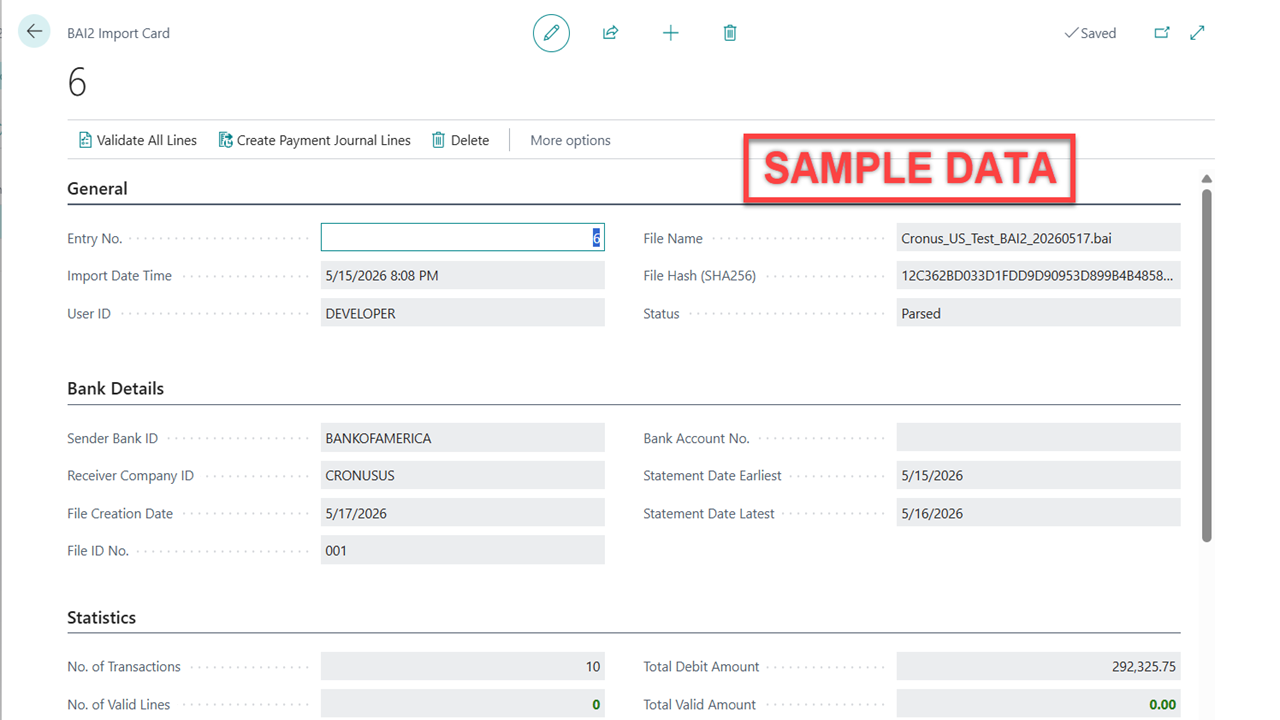
What happens during import:
- The extension computes a SHA256 hash of the file and stores it in File Hash (SHA256). If a file with the same hash was imported before, the import is rejected with a message naming the existing entry. This prevents accidental double-imports.
- The file header populates Sender Bank ID, Receiver Company ID, File Creation Date, and File ID No..
- Each detail (type-16) transaction becomes one line. Continuation (type-88) remittance text is appended to its line and parsed for the originator name, description, reference ID, individual name, company ID, and payment information.
- Each line is classified by its Transaction Type Code. Sweep and unrecognized transaction types are marked Excluded and are left out of matching and transfer. See Transaction Categories.
- Statement Date Earliest and Statement Date Latest are set from the group dates in the file.
- The import Status is set to Parsed.
Expected result: A new import appears in the list with status Parsed, and the card shows the parsed header, statistics, and lines.
4. Step 2: Validate the Lines
Section titled “4. Step 2: Validate the Lines”Goal: Match each non-excluded line to a vendor and an open invoice.
Prerequisites:
- An imported file (status Parsed).
- Vendors and open vendor invoices that the lines can match against.
Steps:
- Open the import from the Corporate Direct Debit BAI2 Import list.
- Choose Validate All Lines.
You can also start validation directly from the list with Validate All Lines, without opening the card.

What happens during validation:
For each non-excluded line, the extension first finds a vendor, then finds an open invoice for that vendor.
Vendor matching, in order:
- By company ID. If the line has a Parsed Company ID, the extension looks for a vendor whose VAT Registration No. equals it. Exactly one match is used. More than one match flags the line Multiple Vendors. If none, it then checks for a vendor whose No. equals the company ID.
- By name (only if Enable Name Matching is on). The extension normalizes the Parsed Originator Name and tries an exact match on the vendor Name, then the vendor Search Name, then a single partial-name match. More than one partial match flags the line Multiple Vendors.
If no vendor is found, the line is flagged Vendor Not Found.
Invoice matching, in order, for the matched vendor:
- By reference. The Parsed Originator Ref ID is matched against the External Document No. of open vendor invoices. A single open match is used. If only a closed (already-applied) invoice matches, the line is flagged Invoice Already Applied. More than one open match flags the line Multi-Invoice Review.
- By payment-information reference. If the reference did not match, a reference extracted from the parsed payment information (an
RMRsegment) is tried the same way. - By document number. As a fallback, the reference is matched against the invoice Document No..
- By amount and date (no-reference fallback only). If the line carries no reference at all, the extension matches by vendor and exact amount among open invoices dated within the Invoice Fallback Date Range, and applies the payment to the latest qualifying invoice.
When an invoice is matched, the imported amount is compared with the invoice’s remaining amount using the Amount Tolerance. Within tolerance, the line is Valid. Outside tolerance, it is Amount Mismatch.
Effect on the import: After validation, an import that was Imported or Parsed moves to Validated. The No. of Valid Lines, No. of Error Lines, and Total Valid Amount statistics update.
Expected result: Every non-excluded line shows a Validation Status and a Validation Message describing the result. Valid lines are shown in green; exceptions in red; lines needing review in amber; excluded lines in grey.
5. Understanding Line Validation Results
Section titled “5. Understanding Line Validation Results”Each line carries a Validation Status and a plain-language Validation Message. The row colour reflects the status.
| Validation Status | Row colour | Meaning |
|---|---|---|
| Valid | Green | Matched to a vendor and an open invoice within amount tolerance. Eligible for transfer. |
| Pending | Amber | Not yet validated. |
| Vendor Not Found | Red | No vendor matched the company ID (or name, if name matching is on). |
| Multiple Vendors | Red | More than one vendor matched. Manual selection required. |
| Invoice Not Found | Red | A vendor matched, but no open invoice matched the reference. |
| Amount Mismatch | Red | An invoice matched, but its remaining amount differs from the payment by more than the tolerance. |
| Invoice Already Applied | Red | The matched invoice is already applied or closed. |
| Multi-Invoice Review | Amber | More than one open invoice matched the reference. Manual selection required. |
| Excluded | Grey | The line is excluded from matching and transfer (sweep or unrecognized transaction type, or excluded manually). |
Only lines with status Valid are transferred to the payment journal.
6. Step 3: Resolve Exceptions
Section titled “6. Step 3: Resolve Exceptions”Goal: Bring every line you intend to pay to a Valid status, and exclude the rest.
Prerequisites: A validated import with one or more exception lines.
The Lines part provides per-line actions. Select one or more lines, then choose the action.
Set the vendor manually
Section titled “Set the vendor manually”For a Vendor Not Found or Multiple Vendors line:
- In the Matched Vendor No. field, choose the lookup and select the correct vendor, or type the vendor number.
- The line revalidates automatically, attempting invoice matching for the vendor you selected.
This sets the vendor for the current line only. The next time the same originator appears in an import, you will have to set the vendor again. To teach the extension to recognise the originator automatically, use Assign Vendor instead.
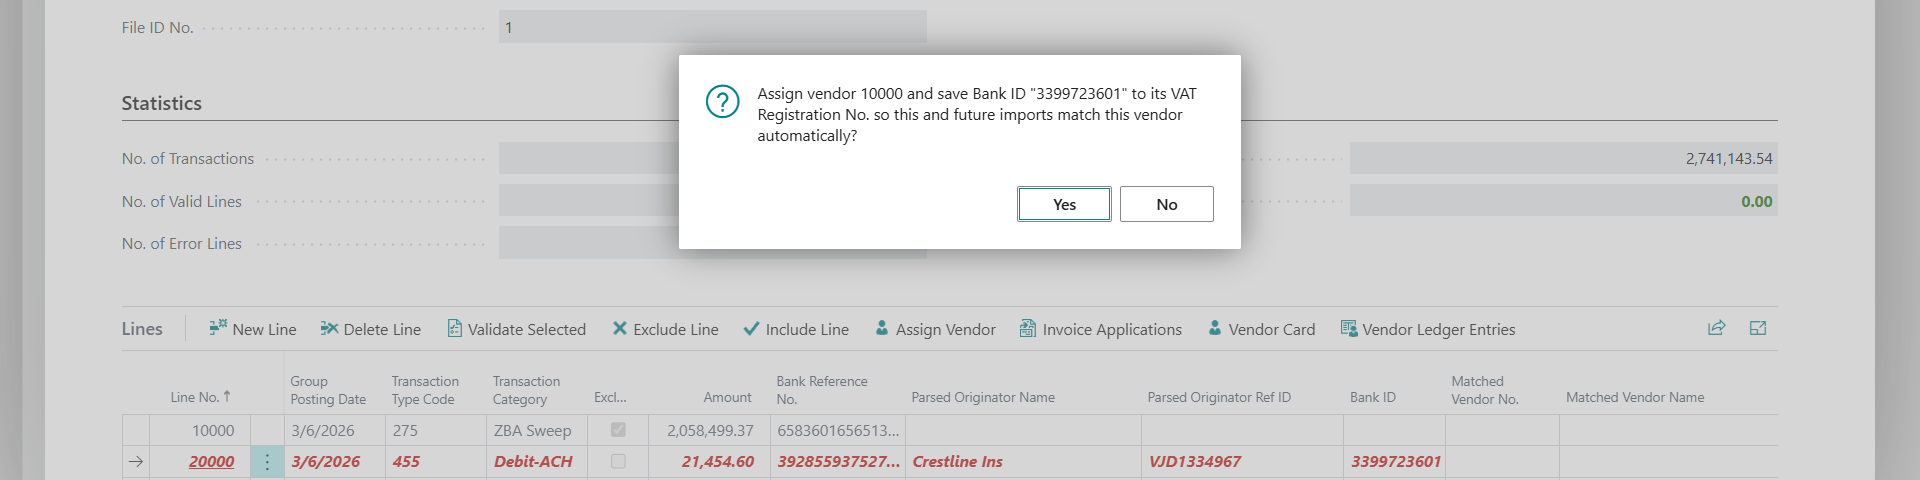
Assign a vendor and remember it (Assign Vendor)
Section titled “Assign a vendor and remember it (Assign Vendor)”The Assign Vendor action does what Set the vendor manually does, and additionally saves the line’s Bank ID (the parsed company ID) onto the chosen vendor so that this and every future import from the same originator match the vendor automatically. Use it on a Vendor Not Found or Multiple Vendors line when you want the match to stick.
-
Select the unmatched line.
-
Choose Assign Vendor from the Lines toolbar.
-
In the Vendor List that opens, select the correct vendor and choose OK.
-
The extension responds in one of three ways, depending on the line and the vendor:
-
The line has a Bank ID and the vendor has none yet. You are asked to confirm:
Assign vendor 10000 and save Bank ID “3399723601” to its VAT Registration No. so this and future imports match this vendor automatically?
Choose Yes to save the Bank ID to the vendor’s VAT Registration No. and revalidate the line. The line then matches to its open invoice and turns Valid. From now on, lines from the same originator match this vendor on their own.
-
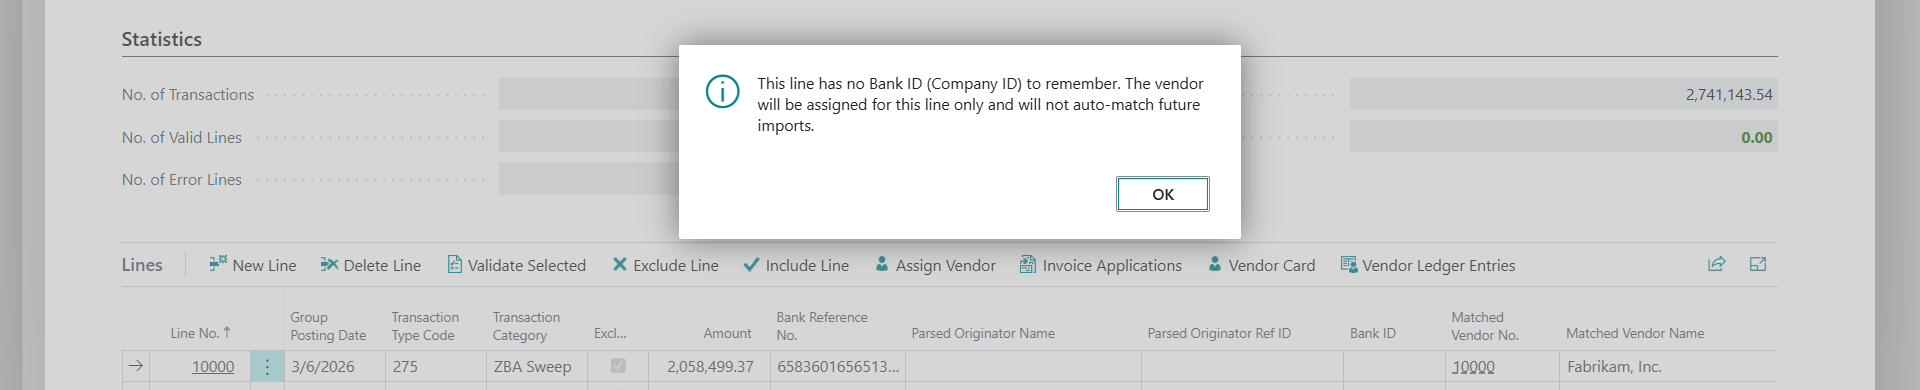
The line has no Bank ID to remember. The extension shows an information message and assigns the vendor for this line only:
This line has no Bank ID (Company ID) to remember. The vendor will be assigned for this line only and will not auto-match future imports.
Choose OK. The vendor is set on the line, but because there is no company ID to store, future imports are not auto-matched.
-
The vendor already has a different VAT Registration No. You are asked whether to replace it with the line’s Bank ID. Choose Yes only if you are sure the existing value should be overwritten, because this changes the vendor record.
-
Why save the Bank ID? Vendor matching during validation looks for a vendor whose VAT Registration No. equals the line’s parsed company ID (see Step 2). Storing the Bank ID there is what makes the originator match automatically on every later import.
Set the invoice manually
Section titled “Set the invoice manually”For an Invoice Not Found or Multi-Invoice Review line, once a vendor is set:
- In the Matched Invoice Doc. No. field, choose the lookup. The lookup lists open invoices for the matched vendor.
- Select the invoice. The line revalidates against the selected invoice and its amount.
- To inspect the chosen invoice, choose the drill-down on Matched Invoice Doc. No. to open the vendor ledger entry.
Re-run matching
Section titled “Re-run matching”After you correct underlying data (for example, you add a vendor or post a missing invoice):
- Choose Validate Selected to re-run matching on the selected lines, or
- Choose Validate All Lines to re-run matching on the whole import.
Exclude a line
Section titled “Exclude a line”For lines you do not want to pay (for example, a transaction that should not produce a payment):
- Select the lines.
- Choose Exclude Line.
- The lines are marked Excluded and are dropped from matching and transfer. Excluded lines are shown in grey.
Review the matched vendor
Section titled “Review the matched vendor”- Choose Vendor Card to open the matched vendor’s card.
- Choose Vendor Ledger Entries to see the matched vendor’s open ledger entries.
Invoice Applications
Section titled “Invoice Applications”The Invoice Applications action opens a list where you can record a breakdown of multiple invoices for the selected line. Use it to document how a single payment relates to several invoices.
Expected result: Every line you intend to pay shows Valid; the remainder are Excluded. The No. of Error Lines statistic reads zero.
7. Step 4: Create Payment Journal Lines
Section titled “7. Step 4: Create Payment Journal Lines”Goal: Transfer valid lines to a payment journal as applied vendor payments.
Prerequisites:
- An import with one or more Valid, non-excluded, not-yet-transferred lines.
- A Payments-type general journal template and batch. The batch should have a No. Series so document numbers are assigned.
Steps:
- On the Corporate Direct Debit BAI2 Import Card, choose Create Payment Journal Lines.
- When prompted, select the Gen. Journal Batch to receive the lines and confirm. If you cancel without selecting a batch, the transfer stops.
- The extension creates one payment journal line per valid line and confirms with a message showing the count and the batch.

What each created line contains:
- Document Type is Payment, with a document number drawn from the batch’s number series, dated to the line’s Group Posting Date.
- Account Type Vendor, Account No. the matched vendor.
- Amount set to the line’s imported payment amount.
- Applies-to Doc. No. set to the matched invoice, so the payment is applied on posting.
- External Document No. set to the bank reference, and a description built from the bank reference, originator name, and parsed description.
- Payment Method Code set from Default Payment Method Code when Apply Default Payment Method is enabled in Setup.
- Bal. Account Type and Bal. Account No. set from Default Bal. Account Type and Default Bal. Account No. when a default balancing account is configured in Setup. When Default Bal. Account No. is blank, the balancing account is left empty on the line.
Effect on the import: Each transferred line is marked Transferred to Journal and records its template, batch, and document number. The import Status moves to Transferred.
Re-running the action transfers only lines that are valid and not yet transferred. Lines already transferred are skipped, so you can safely validate and transfer additional lines later without duplicating payments.
Expected result: A confirmation message reports the number of lines transferred and the target batch. The lines now exist in the selected payment journal batch.
8. Step 5: Post the Payment Journal
Section titled “8. Step 5: Post the Payment Journal”Goal: Post the generated vendor payments.
Prerequisites: Payment journal lines created by Step 4.
Steps:
- Open the payment journal batch you transferred to.
- Review the lines. Each is applied to its matched invoice.
- Post the journal using the standard posting action.
Expected result: Vendor payments are posted and applied to their invoices. The imported transactions are now reflected in your vendor ledger.
9. Managing Imports
Section titled “9. Managing Imports”The Corporate Direct Debit BAI2 Import list shows every import with its statistics and status.
- Entry No., Import Date Time, File Name, the statement date range, Bank Account No., transaction and line counts, Total Debit Amount, and Status.
- No. of Valid Lines is shown in green; No. of Error Lines in red.
Actions available from the list:
- Import New File. Start a new import (see Step 1).
- Validate All Lines. Re-run matching on the selected import.
- Delete Import. Delete the selected import and all of its lines, after a confirmation prompt.
Actions available from the card:
- Validate All Lines, Create Payment Journal Lines, and Delete. Deleting from the card removes the import and its lines, then closes the card.
If parsing fails, the import Status is Error and the card shows a Parse Error Message describing the problem.
10. Test Data Generator (Sandbox Only)
Section titled “10. Test Data Generator (Sandbox Only)”Use this only in a sandbox environment. The generator creates vendors and posts purchase invoices to give an imported file something to match against. Running it against production data would post real invoices. The action refuses to run outside a sandbox and shows a message if you attempt it.
Goal: For a chosen import, create any missing vendors and post open purchase invoices so that each non-excluded line has a matchable vendor and invoice.
Prerequisites:
- A sandbox environment.
- An existing import to read lines from.
- A reference vendor whose posting setup can be cloned.
- A Purchases-type general journal template and batch, the batch having a number series.
- A posting G/L account.
Steps:
-
Choose the Tell Me icon, enter Corporate Direct Debit BAI2 Test Data Generator, and open the page.
-
Complete the fields:
Source Import
- Import Header Entry No. The import whose lines are read. The generator creates a vendor and a posted open invoice for each non-excluded line so the validator can match them.
Vendor Setup
- Reference Vendor No. An existing vendor whose posting groups (Vendor Posting Group, Gen. Bus., VAT Bus., Payment Terms, Payment Method) are cloned onto any new vendor the generator creates.
- Vendor No. Prefix. The prefix used when building a new vendor number. The suffix is derived from the parsed originator name. Defaults to
BAI2T-.
Journal / Posting
- Journal Template Name. A Purchases-type template used to post the seeded invoices. Changing it clears the batch.
- Journal Batch Name. The batch used to post the seeded invoices. The batch must have a number series.
- Balancing G/L Account No. The expense account used as the balancing side of each seeded invoice. It must be a posting account with direct posting enabled.
- Override Posting Date. A single posting date for every seeded invoice. Leave blank to use each line’s Group Posting Date (recommended, since it matches the statement day).
-
Choose Generate Test Data.
Expected result: Missing vendors are created and open purchase invoices are posted so that running Validate All Lines on the source import produces matched, valid lines.
11. Reference: Transaction Categories
Section titled “11. Reference: Transaction Categories”Each line’s Transaction Type Code is classified into a Transaction Category. Excluded categories are dropped from matching and transfer.
| Type Code | Transaction Category | Excluded |
|---|---|---|
| 455 | Debit-ACH | No |
| 464 | Debit-EDI | No |
| 165 | Debit-Other | No |
| 491 | Book Wire | No |
| 495 | Wire Out | No |
| 275 | ZBA Sweep | Yes |
| 575 | ZBA Sweep | Yes |
| Any other code | Other | Yes |
You can override exclusion on a line manually with Exclude Line. There is no action to un-exclude a line; re-import the file if you need a previously excluded line included.
12. Reference: Validation Statuses
Section titled “12. Reference: Validation Statuses”See Understanding Line Validation Results for the full status table and what each status means for the line.
Import-level Status values progress as follows:
| Status | Set when |
|---|---|
| Imported | The file is uploaded, before parsing. |
| Parsed | The file has been parsed into lines. |
| Validated | Validation has run on the lines. |
| Transferred | Valid lines have been transferred to a payment journal. |
| Processed | Defined for future use. Not set by the current version. |
| Error | Parsing failed. See Parse Error Message. |