
Blue Dragonfly FloQast Trial Balance Integration
FloQast Integration product page
The Blue Dragonfly FloQast Trial Balance Integration is a Microsoft Dynamics 365 Business Central extension that uploads General Ledger trial balance data, with shortcut dimension analysis, to the FloQast close management platform.
1. Overview
Section titled “1. Overview”What it does:
- Extracts trial balance data from Business Central G/L Entries
- Splits the data into Profit & Loss month-to-date (MTD) amounts and Balance Sheet year-to-date (YTD) balances
- Embeds shortcut dimension values into the account number and name fields (e.g.,
4000|OPS,Sales Revenue|Operations) - Combines P&L and BS data into a single payload and uploads it via the FloQast API
- Supports multiple shortcut dimensions (1–8), each uploaded independently to its own FloQast entity
- Supports a Natural Account Upload mode that uploads trial balance data without dimension values to a separate FloQast entity
- Uploads the Chart of Accounts (account numbers and names) to FloQast for each configured entity, with or without dimension cross-joins
- Provides a full audit trail of every upload attempt in the Activity Log
Key pages in Business Central:
| Page | Purpose |
|---|---|
| FloQast Setup | One-time administrator configuration (API credentials, dimensions) and COA upload |
| FloQast Upload | Routine period-end upload of trial balance data and COA upload |
| FloQast Preview | Interactive data review and test submission for trial balance or chart of accounts |
| FloQast Activity Log | Audit trail of all upload and connection test events |
2. Installation
Section titled “2. Installation”Prerequisites
Section titled “Prerequisites”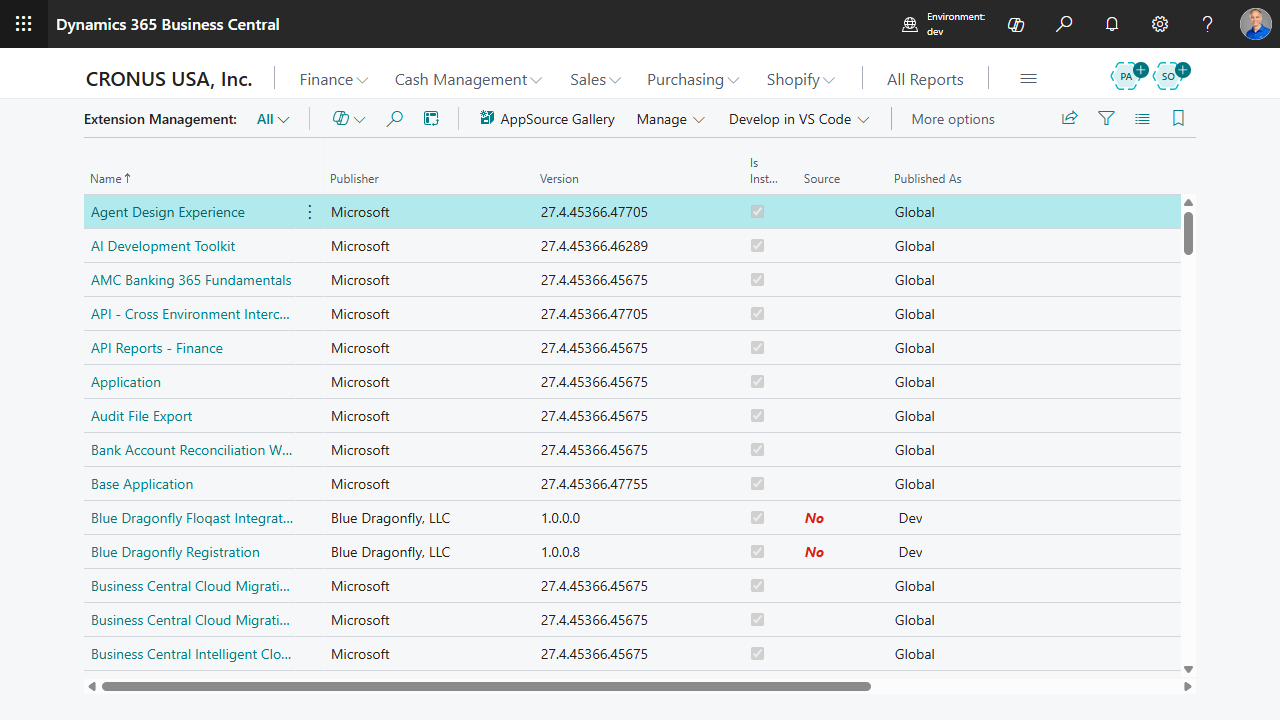
- Microsoft Dynamics 365 Business Central online (version 26.0 or later)
- A FloQast account with API access enabled
- The FloQast API Key (obtained from FloQast Admin → API Settings)
- The FloQast Entity ID for the Business Central company (obtained from FloQast Settings → Entities)
- At least one Shortcut Dimension configured in Business Central’s General Ledger Setup
Installing the Extension
Section titled “Installing the Extension”- In Business Central, use the search bar (Alt+Q) and search for Extension Management.
- Select Extension Management to open the page.
- Install the extension using the method provided by your administrator:
- AppSource: Search for “Blue Dragonfly Floqast Integration” in the marketplace and click Install.
- Per-Tenant Extension (PTE): Your administrator will upload the
.appfile directly via Extension Management → Upload Extension.
- Follow the on-screen prompts to complete the installation.
- After installation, the extension automatically creates the initial setup record with default values.
Registering the Extension
Section titled “Registering the Extension”The extension requires a one-time registration before its FloQast actions can be used.
- The first time you open a Role Center after installing the extension, a registration wizard opens automatically.
- Complete the wizard to register the extension.
- When registration completes successfully, the FloQast Setup page opens automatically.
If registration does not complete, the following message is displayed:
Registration Process did not complete. Please contact us at support@bluedragonflyllc.com
To start registration again later, open FloQast Setup and click the Register action (in the Administration action group). Use this if registration was not completed during initial setup.
To refresh the extension’s license after your registration or subscription changes, click the Sync License action on FloQast Setup.
3. Configuration
Section titled “3. Configuration”Configuration is performed once per Business Central company (or whenever credentials or dimension mapping need to change). Only users with the FloQast Admin permission set should configure the extension.
3.1 Opening FloQast Setup
Section titled “3.1 Opening FloQast Setup”- In Business Central, use the search bar (Alt+Q) and type FloQast Setup.
- Select FloQast Setup from the search results to open the setup card page.
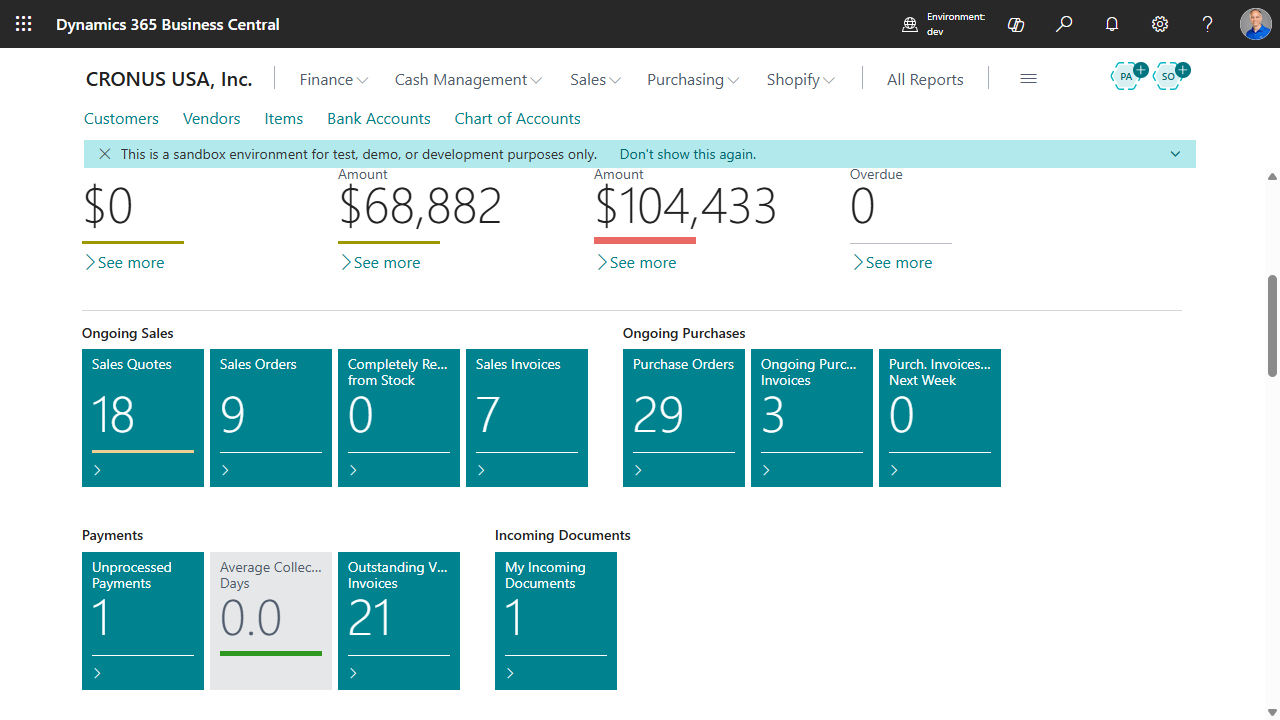
The setup page is organized into the following sections:
- API Credentials — Connection details for the FloQast API
- Natural Account Upload — Optional entity for uploading trial balance data without dimension values
- COA Dimension Filter — Controls how the Chart of Accounts upload builds dimension account combinations
- Configured Dimensions — Which shortcut dimensions to include in uploads, each with its own FloQast Entity ID
- Upload Status — Read-only display of the most recent upload result
- Diagnostics — Optional detailed logging settings for troubleshooting
3.2 API Credentials
Section titled “3.2 API Credentials”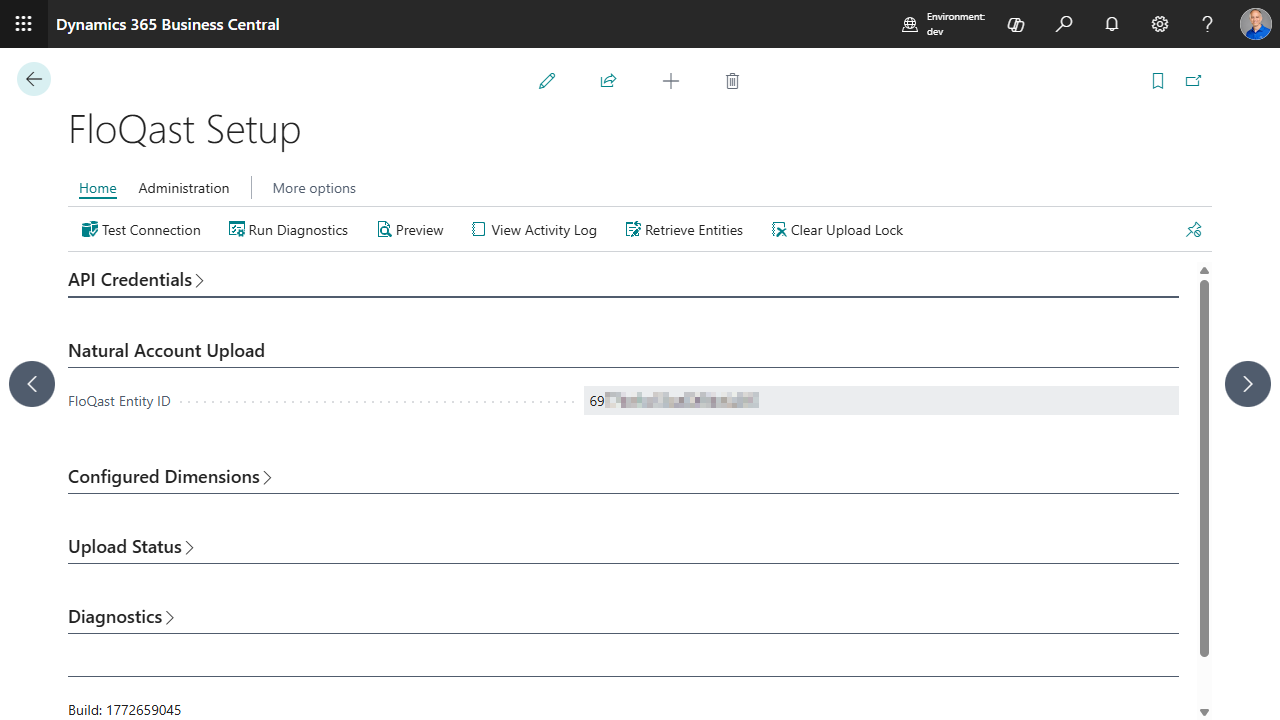
Configure the following fields in the API Credentials section:
| Field | Description | Default |
|---|---|---|
| API Base URL | The FloQast API endpoint URL. Use the default for US-region FloQast accounts. Change for EU or Australia regions. | https://fq-api.floqast.app/api/v1 |
| API Key | Your FloQast API key. Displayed as masked characters (••••) for security. The key is stored securely in Business Central’s Isolated Storage, not in the database. | (blank — must be entered) |
| Number Delimiter | The character inserted between the G/L Account No. and the Dimension Value Code when embedding dimensions into the FloQast account number and name fields. | | |
To enter the API Key:
- Click in the API Key field.
- Type or paste your FloQast API key.
- The field will display masked characters (e.g.,
••••••••) after entry. The actual key is stored securely and is not visible on the page.
To look up Entity IDs:
You can use the Retrieve Entities action in the action bar to call the FloQast API and display the list of entities associated with your API key. Locate the entity that corresponds to each dimension or the natural account upload and copy its ID into the appropriate FloQast Entity ID field.
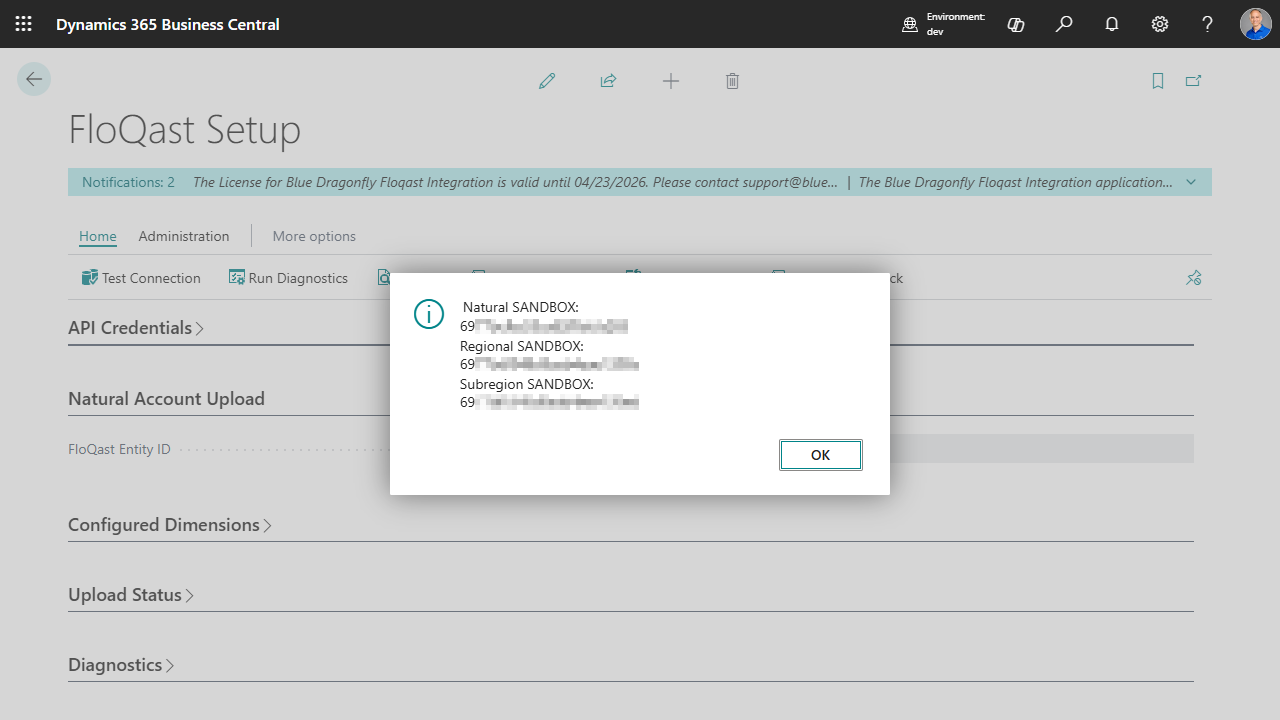
3.3 Dimension Mapping
Section titled “3.3 Dimension Mapping”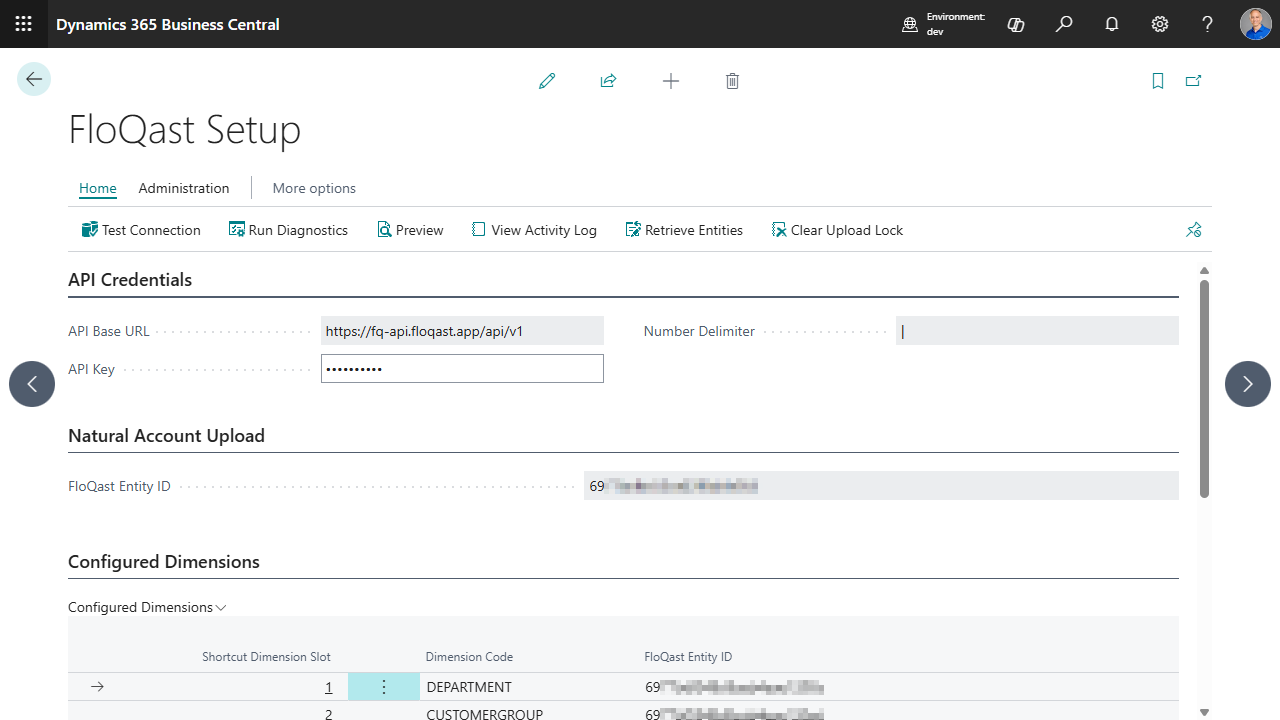
The Configured Dimensions section is where you specify which of Business Central’s eight shortcut dimensions should be included in the trial balance upload. Each dimension is uploaded to its own FloQast entity.
Each configured dimension results in a single combined API upload per period (P&L MTD and BS YTD accounts are merged into one payload). For example, if you configure dimensions 1 and 3, each upload will make two API calls total (one per dimension).
To add a dimension:
- In the Configured Dimensions section, click in a new row.
- Enter the Shortcut Dimension Slot number (1 through 8).
- The Dimension Code column automatically displays the dimension code configured in General Ledger Setup for that slot (e.g.,
DEPARTMENT,PROJECT). - Enter the FloQast Entity ID for this dimension. Each dimension submits its data to a separate FloQast entity. Use the Retrieve Entities action to look up available Entity IDs.
Validation rules:
- The slot number must be between 1 and 8.
- The slot must have a Dimension Code configured in General Ledger Setup (under Financial Management → General Ledger Setup → Dimensions tab).
- The same slot cannot be configured more than once.
- Each dimension must have a FloQast Entity ID configured.
To remove a dimension:
Select the row and delete it.
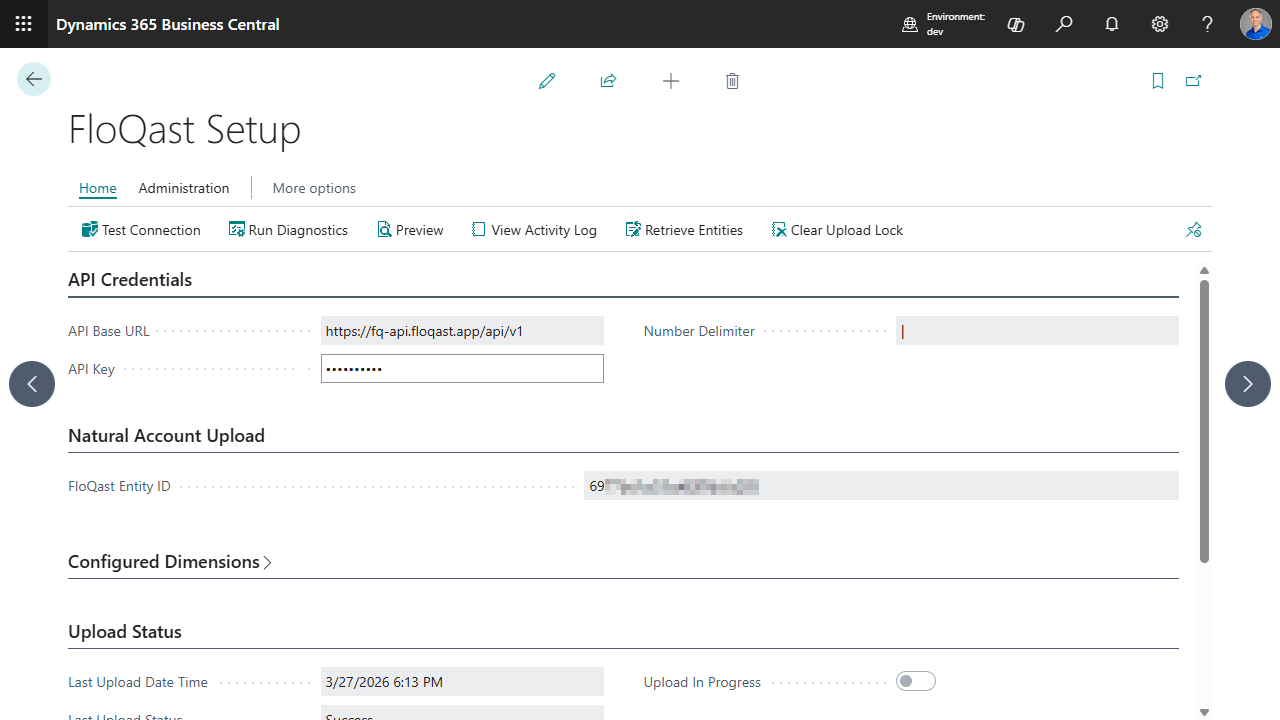
3.4 Natural Account Upload
Section titled “3.4 Natural Account Upload”The Natural Account Upload section allows you to upload a trial balance without dimension values — just the G/L account numbers and names with their balances. This is useful when FloQast needs a “plain” trial balance in addition to the dimension-breakdown uploads.
| Field | Description | Default |
|---|---|---|
| Natural Acct Entity ID | The FloQast Entity ID for the natural account (account-only) upload. Leave blank to skip natural account uploads. | (blank) |
When a Natural Acct Entity ID is configured:
- The upload process includes two additional API calls (one for P&L MTD and one for BS YTD) that submit account data without any dimension embedding.
- The account
numberandnamefields contain only the G/L Account No. and G/L Account Name (no delimiter or dimension values). - Natural account uploads appear in the Activity Log with a blank Dimension Code.
3.5 Diagnostics Settings
Section titled “3.5 Diagnostics Settings”The Diagnostics section of the setup page contains the following field:
| Field | Description | Default |
|---|---|---|
| Enable Detailed Diagnostics | When enabled, a Diagnostics entry is written to the Activity Log for each failed API call. The entry includes a sample of the account data that was sent, the extracted API error message, and the full response body. Disable when not actively troubleshooting to reduce log volume. | Off |
3.6 COA Dimension Filter
Section titled “3.6 COA Dimension Filter”Use the COA Dimension Filter section to control how much data a dimension Chart of Accounts upload generates.
| Field | Description | Default |
|---|---|---|
| Used Combinations Only | When turned off, a dimension COA upload sends every possible combination of G/L Account and Dimension Value (a full cross-join). When turned on, it sends only the Account and Dimension Value combinations that appear in posted G/L Entries within the history window. | Off |
| Combinations History (Years) | The number of years of G/L Entry history to scan when identifying used combinations. For example, when set to 5, combinations posted within the last 5 years (inclusive) are uploaded. Editable only when Used Combinations Only is turned on. | 5 |
In companies with many accounts and dimension values, a full cross-join can exceed FloQast’s API payload limit (approximately 1 MB, or about 10,000 records, per upload). Turning on Used Combinations Only reduces the upload to combinations that actually occur in your posting history, which keeps the payload within the limit and removes combinations that never carry activity. Leave it off when you want FloQast to receive every account and dimension value combination regardless of activity.
[SCREENSHOT: page=“FloQast Setup”, navigation=“Tell Me → FloQast Setup”, focus=“COA Dimension Filter FastTab (Used Combinations Only, Combinations History (Years))”, caption=“COA Dimension Filter settings on the FloQast Setup page”]
4. Connection Test
Section titled “4. Connection Test”After configuring the API credentials and at least one dimension (or a Natural Acct Entity ID), test the connection to confirm that Business Central can communicate with the FloQast API.
- On the FloQast Setup page, click the Test Connection action in the action bar.
- The system validates that all required setup fields are populated and then sends a test request to the FloQast API.
- A message is displayed:
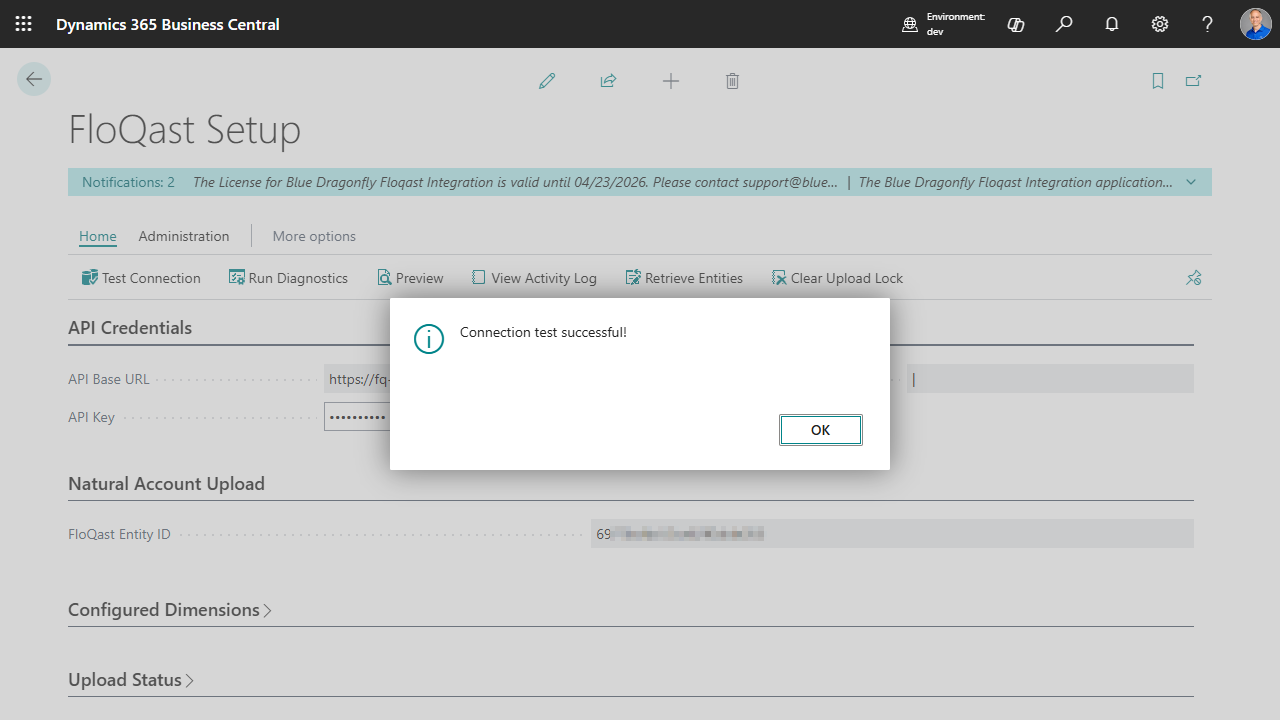
- Success:
Connection test successful!— The API key, base URL, and network connectivity are all working correctly. - Failure:
Connection test failed: <error details>— Review the error message. Common causes include:- Invalid or expired API key
- Incorrect API Base URL (wrong region)
- Network connectivity issues
The test connection attempt is recorded in the Activity Log for audit purposes.
5. Trial Balance Data Review (Preview)
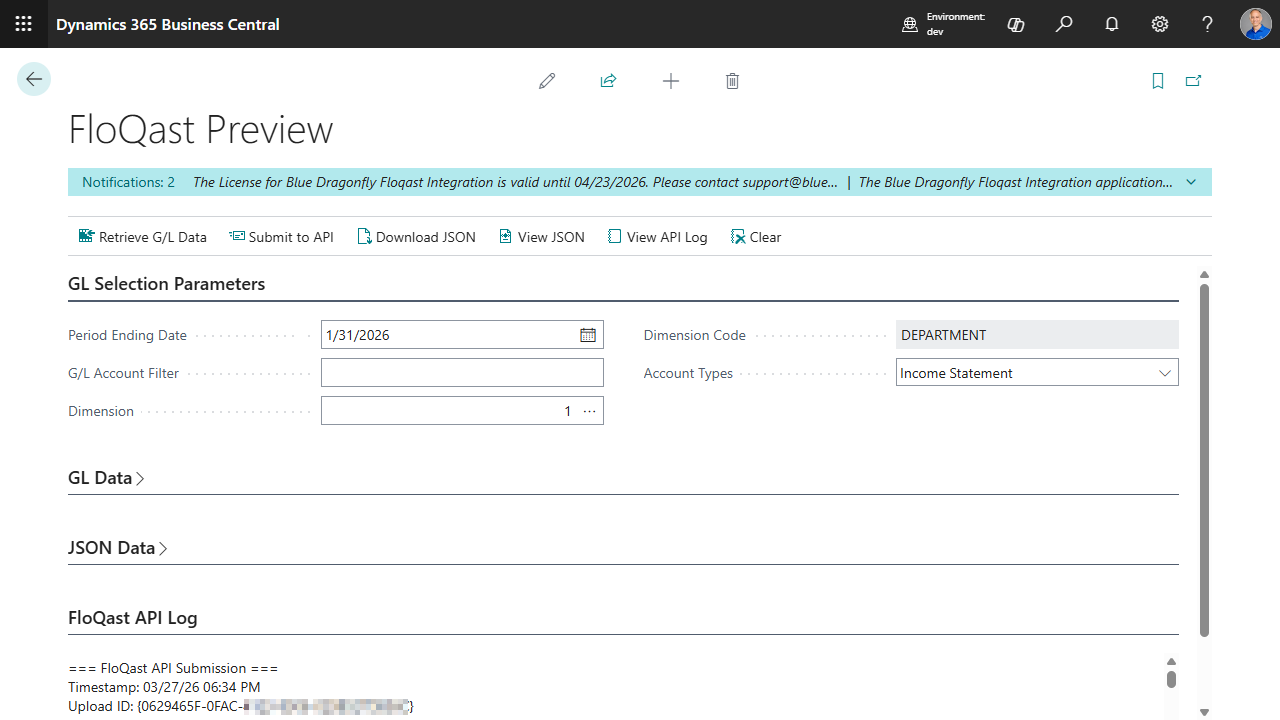
Section titled “5. Trial Balance Data Review (Preview)”The FloQast Preview page allows you to extract and review trial balance data for a single dimension and account type before sending it to FloQast. This is the recommended way to verify that your data looks correct before performing a full upload.
Opening the Preview Page
Section titled “Opening the Preview Page”- From the FloQast Setup page, click the Preview action.
- Or use the search bar (Alt+Q) and search for FloQast Preview.
Retrieving G/L Data
Section titled “Retrieving G/L Data”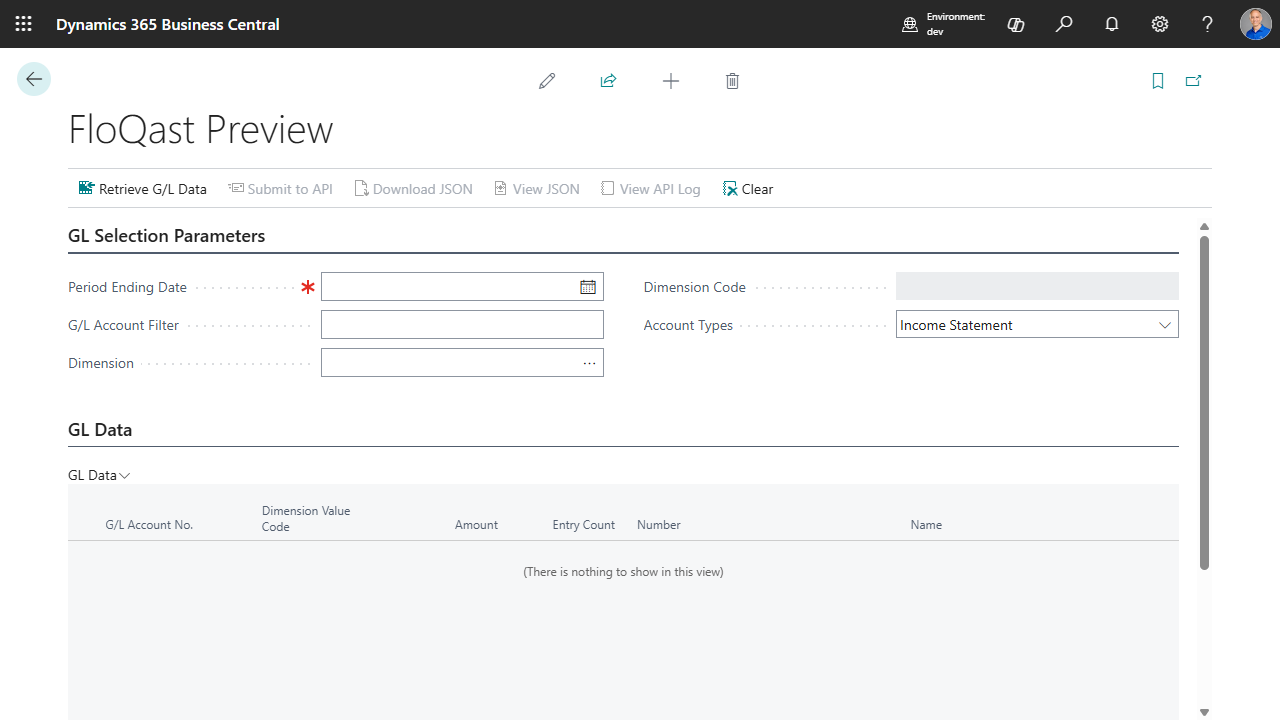
-
On the FloQast Preview page, fill in the GL Selection Parameters:
Field Description Period Ending Date The last day of the accounting period (e.g., 01/31/2026for January 2026).G/L Account Filter (Optional) Standard Business Central filter syntax to limit which accounts are included (e.g., 4000..4999).Dimension Select one of the configured shortcut dimension slots from the lookup. Leave blank (0) to preview a Natural Account upload (no dimension embedding). Dimension Code Automatically populated based on the selected dimension slot (read-only). Blank when using natural account mode. Account Types Choose Balance Sheet or Income Statement to select which category of accounts to extract. Defaults to Income Statement. -
Click the Retrieve G/L Data action.
-
The GL Data section displays the extracted trial balance lines:
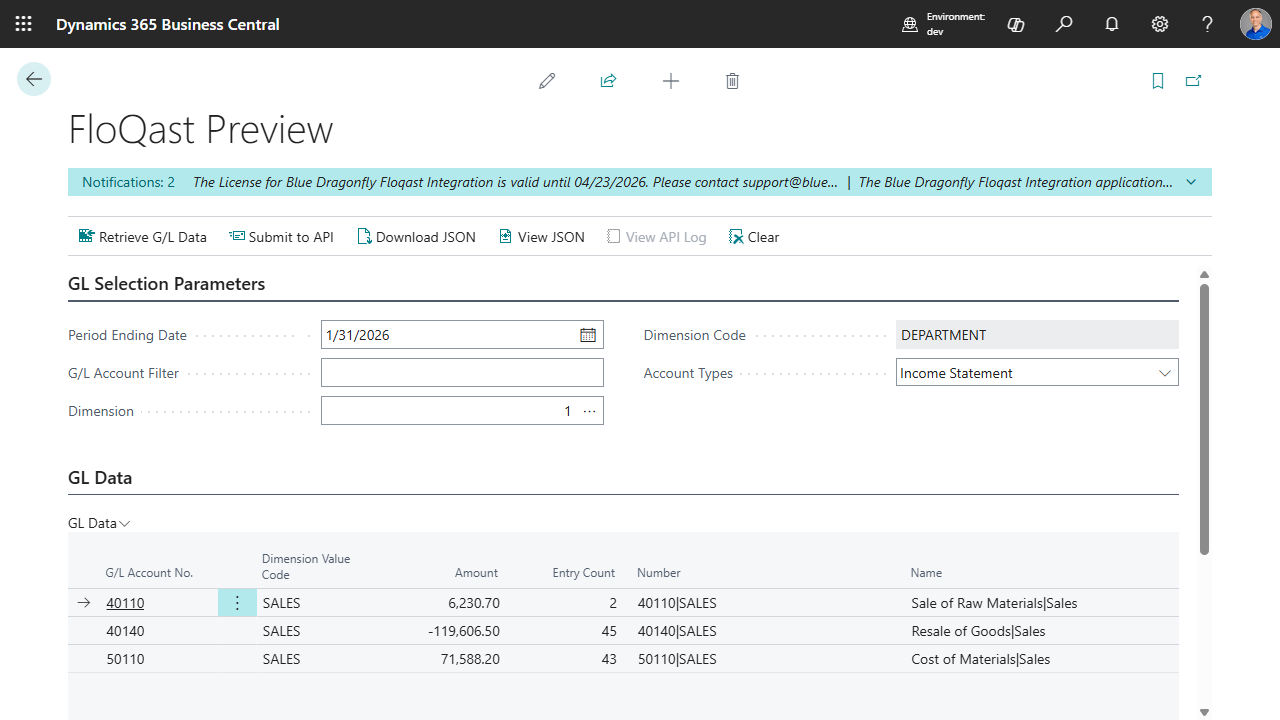
| Column | Description |
|---|---|
| G/L Account No. | The posting account number |
| Dimension Value Code | The dimension value for this line (blank if no dimension assigned) |
| Amount | The net amount (MTD for Income Statement, YTD for Balance Sheet) |
| Entry Count | Number of G/L Entries that contributed to this amount |
| FloQast Number | The computed value that will be sent as the number field (e.g., 4000|OPS) |
| FloQast Name | The computed value that will be sent as the name field (e.g., Sales Revenue|Operations) |
- Review the data to confirm:
- The correct accounts are included
- Dimension values are populated as expected (blank for natural account mode)
- Amounts look reasonable for the period
- The FloQast Number and FloQast Name columns show the expected delimiter-separated format (or plain account numbers/names for natural account mode)
Additional Preview Actions
Section titled “Additional Preview Actions”- View API Log — After submitting to the API, this action opens the full API communication log in a scrollable full-screen viewer.
- Clear — Resets all GL Data, JSON Data, and API Log sections to their initial empty state.
6. JSON Data Review
Section titled “6. JSON Data Review”When you retrieve G/L data on the Preview page, the extension also generates the JSON payload that would be sent to the FloQast API. This is displayed in the JSON Data section of the Preview page.
Viewing the JSON Payload
Section titled “Viewing the JSON Payload”After clicking Retrieve G/L Data, scroll down to the JSON Data section to see the formatted JSON.
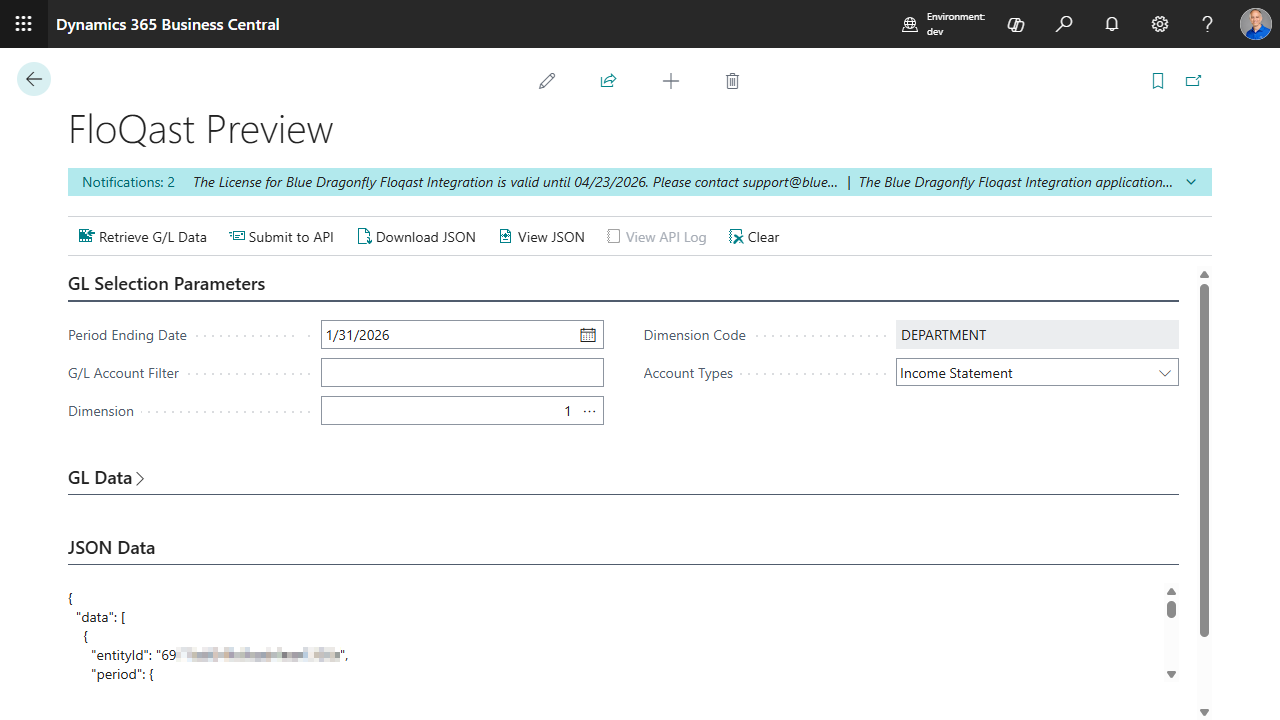
The payload follows this structure:
{ "data": [ { "entityId": "dimension-specific-entity-id", "period": { "month": "january", "year": "2026" }, "accounts": [ { "number": "4000|OPS", "name": "Sales Revenue|Operations", "balance": "15230.50" }, { "number": "4000|ADM", "name": "Sales Revenue|Administration", "balance": "8750.00" } ] } ]}Full-Screen JSON Viewer
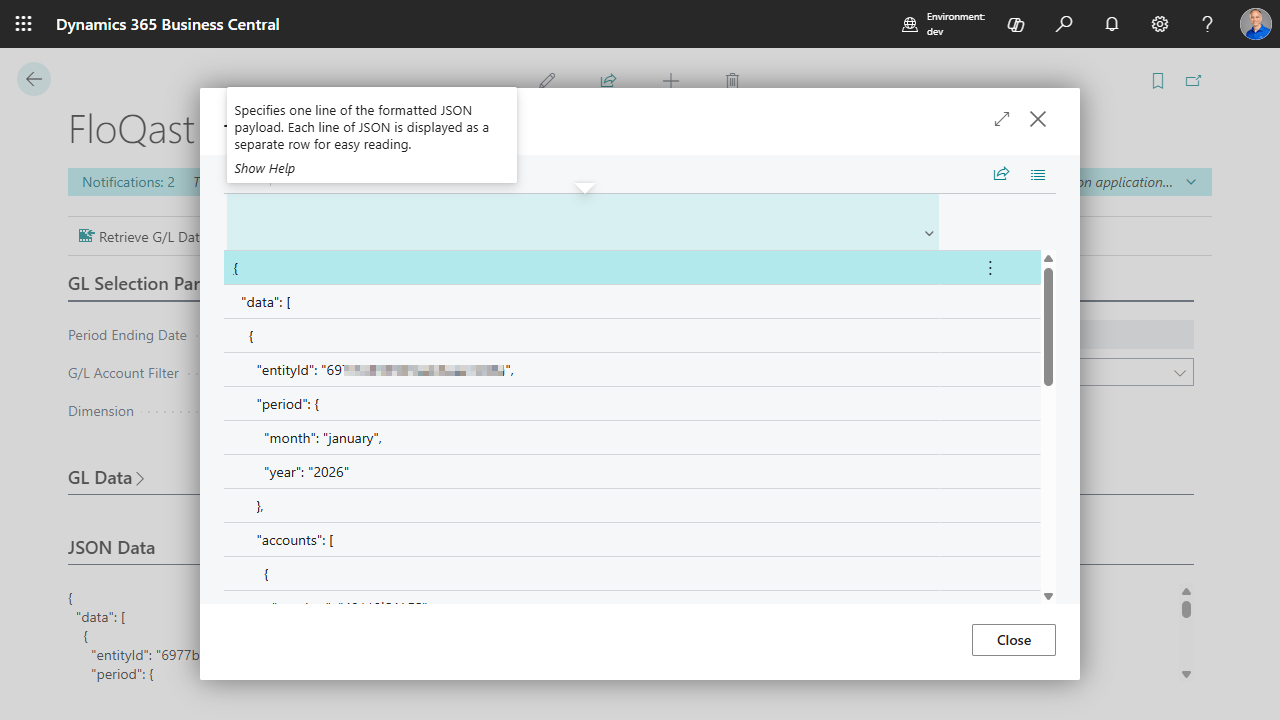
Section titled “Full-Screen JSON Viewer”For large payloads, click the View JSON action to open the JSON in a full-screen scrollable viewer (the JSON Payload Viewer page). This makes it easier to review large datasets.
Downloading the JSON
Section titled “Downloading the JSON”Click the Download JSON action to save the JSON payload as a .json file to your local computer. This is useful for:
- Offline review in a text editor or JSON viewer tool
- Sending to FloQast support for troubleshooting
- Archiving the exact payload for audit purposes
7. Initial Testing — Submitting from the Preview Page
Section titled “7. Initial Testing — Submitting from the Preview Page”The Preview page includes a Submit to API action that lets you send the currently displayed JSON payload directly to the FloQast API for a single dimension and account type. This is the recommended approach for initial testing before performing a full upload.
Step-by-Step Test Submission
Section titled “Step-by-Step Test Submission”- Open the Preview page (from FloQast Setup → Preview).
- Configure the parameters:
- Set the Period Ending Date to a recent closed period.
- Select a Dimension from the lookup (or leave blank to test a Natural Account upload).
- Choose Income Statement or Balance Sheet as the account type.
- Click “Retrieve G/L Data” to extract and review the data.
- Review the GL Data and JSON sections to confirm the data is correct.
- Click “Submit to API” to send the JSON payload to FloQast.
- Review the result:
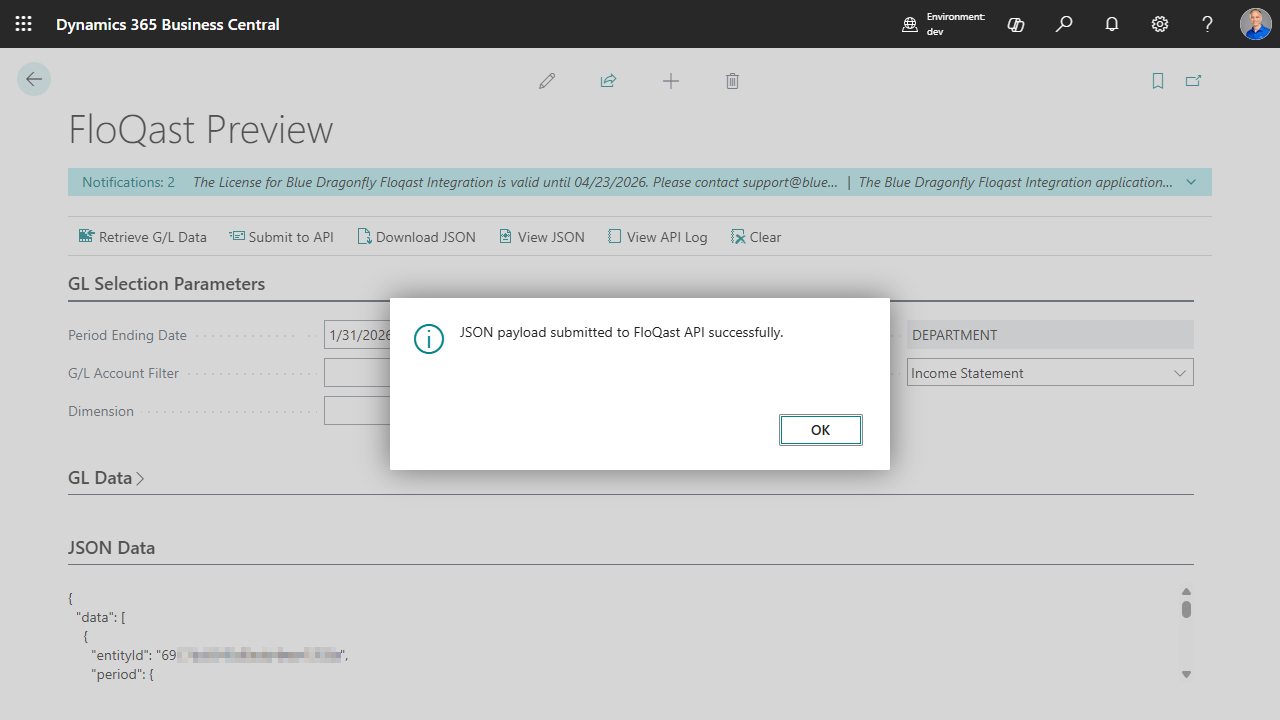
- Success: A message confirms
JSON payload submitted to FloQast API successfully. - Failure: An error message displays the HTTP status code and error details, e.g.,
API submission failed. HTTP Status: 401. Error: Unauthorized.
- Success: A message confirms
- Review the API Log section on the Preview page, which shows the full HTTP communication details (request URL, headers, response status, response body). Click View API Log to open the log in a full-screen viewer.
What to Verify
Section titled “What to Verify”- The submission returns HTTP 200 (success) or 303 (redirect, also treated as success).
- The data appears correctly in FloQast (see Section 10: Verifying Submissions on the FloQast Web Site).
- Account numbers include the dimension delimiter as expected (e.g.,
4000|OPS). - Amounts match your expectations for the selected period.
8. Uploading Trial Balance Data
Section titled “8. Uploading Trial Balance Data”Once you have verified the data via the Preview page, use the FloQast Upload page for routine period-end uploads. This page processes all configured dimensions in a single operation.
Opening the Upload Page
Section titled “Opening the Upload Page”- In Business Central, use the search bar (Alt+Q) and type FloQast Upload.
- Select FloQast Upload from the search results.
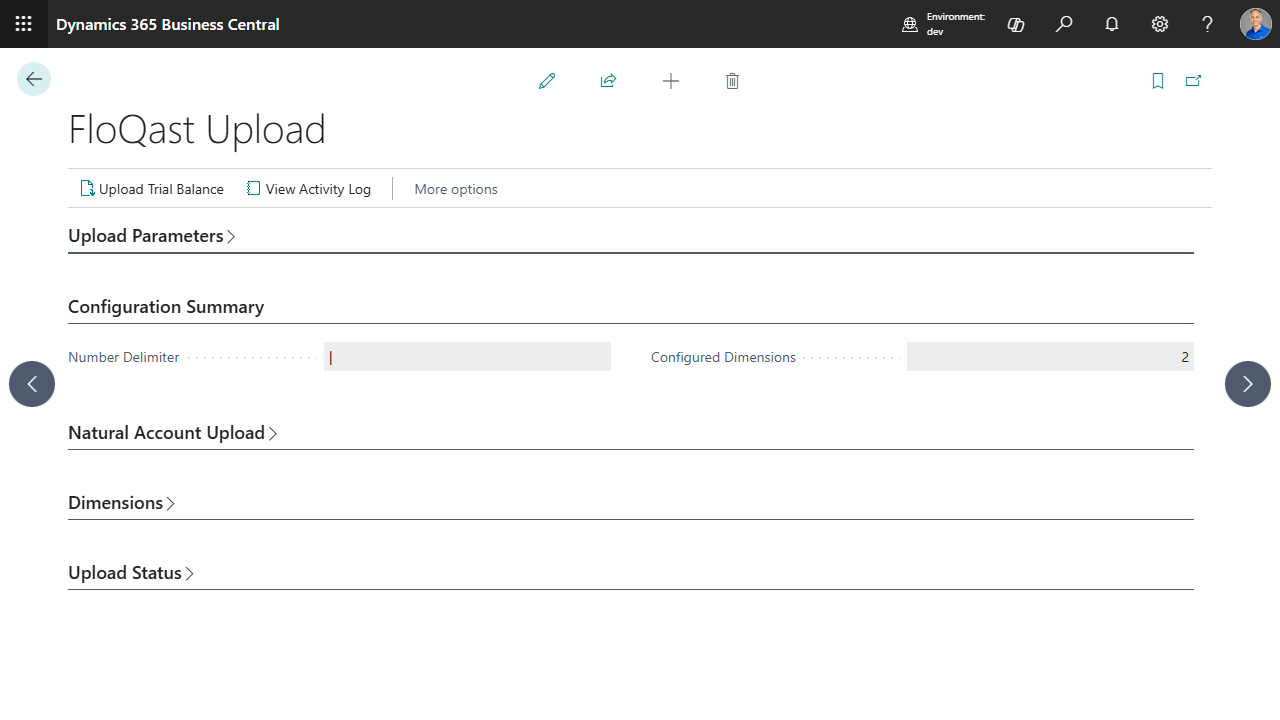
The page is organized into the following sections:
- Upload Parameters — Period Ending Date and optional G/L Account Filter (enter these before clicking Upload)
- Configuration Summary — Number Delimiter and number of configured dimensions (read-only)
- Natural Account Upload — Natural Acct Entity ID (read-only, configured on the Setup page)
- Dimensions — Read-only list of configured dimensions and their Entity IDs
- Upload Status — Last upload date/time, status, and upload lock indicator
Performing an Upload
Section titled “Performing an Upload”- On the FloQast Upload page, enter the following in the Upload Parameters section:
- Period Ending Date (required) — The last day of the accounting period (e.g.,
01/31/2026). - G/L Account Filter (optional) — A standard Business Central filter to limit which G/L accounts are included (e.g.,
4000..9999). Leave blank to include all posting accounts.
- Period Ending Date (required) — The last day of the accounting period (e.g.,
- Click the Upload Trial Balance action.
- A progress dialog displays while the upload is running. If retry attempts are needed for transient errors, the dialog indicates the retry status.
- When the upload completes, a notification is displayed:
- Success: A summary such as “FloQast upload completed successfully. Dimensions: 3, Records: 1,250, Period: January 2026”
- Partial Success: “FloQast upload completed with errors. Successful: 2, Failed: 1, Error: …”
- Warning (Skipped): If an extraction produces zero records for a dimension, that upload is skipped and logged with a Warning status.
- Failure: “FloQast upload failed. Error: …”
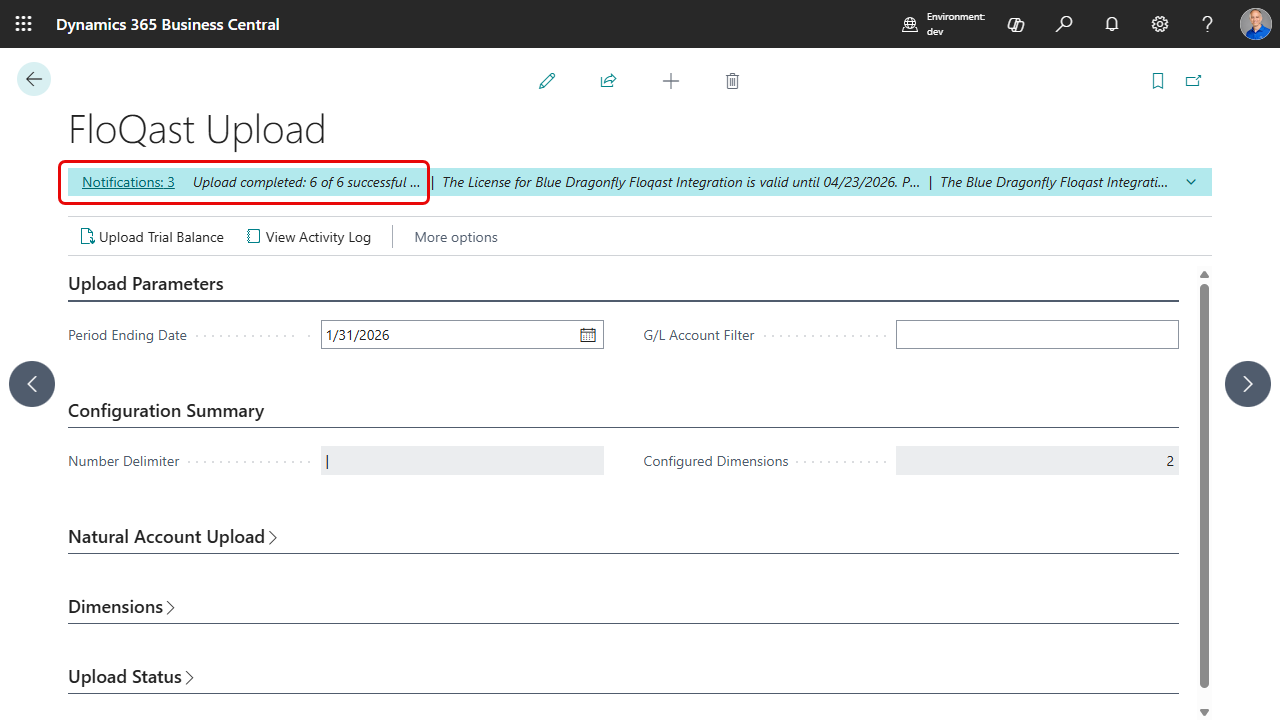
- Click View Activity Log (in the notification or in the page actions) to review detailed results.
How the Upload Works
Section titled “How the Upload Works”For each configured dimension, the system performs the following:
- Extracts Income Statement (P&L) accounts using date Range mode (first day of the month through the Period Ending Date) to calculate month-to-date amounts.
- Extracts Balance Sheet accounts using AsOf mode (cumulative through the Period Ending Date) to calculate year-to-date balances.
- Merges both extractions into a single combined dataset, sorted by account number and dimension value code.
- Transforms the combined extract into FloQast JSON format, embedding dimension values into the account
numberandnamefields. - Uploads the combined JSON payload to the FloQast API via HTTP PUT to the Entity ID configured for that dimension. P&L and BS data are submitted in a single API call per dimension.
- If an extraction returns zero records for both P&L and BS, the upload for that dimension is skipped and logged with Event Type = Upload Skipped and Status = Warning.
- If a transient error occurs (HTTP 5xx or timeout), the system retries up to 2 additional times (3 total attempts) with delays of 5 and 15 seconds.
Natural Account Upload: If a Natural Acct Entity ID is configured on the Setup page, the system also performs a natural account upload (P&L MTD + BS YTD combined) without dimension embedding. This produces one additional API call to the natural account entity.
Re-Uploading
Section titled “Re-Uploading”If an upload fails or data needs to be corrected, simply perform a new upload for the same period. The FloQast API treats uploads as idempotent — uploading to the same entity and period overwrites the previous data.
9. Downloading Data for Offline Review
Section titled “9. Downloading Data for Offline Review”The FloQast Upload page provides two download options for reviewing the extracted data off-line, without submitting anything to FloQast:
Download JSON (ZIP)
Section titled “Download JSON (ZIP)”- On the FloQast Upload page, click JSON in the Download action group.
- Enter the Period Ending Date and optional G/L Account Filter in the Upload Parameters section (if not already entered), then click the JSON action.
- A ZIP file is downloaded containing one
.jsonfile per dimension and account type. Files are named:FloQast_{DimensionCode}_{PL_MTD}_{YYYYMMDD}.jsonFloQast_{DimensionCode}_{BS_YTD}_{YYYYMMDD}.json- If Natural Acct Entity ID is configured:
FloQast_NaturalAcct_{PL_MTD}_{YYYYMMDD}.jsonandFloQast_NaturalAcct_{BS_YTD}_{YYYYMMDD}.json
Download Excel
Section titled “Download Excel”- On the FloQast Upload page, click Excel in the Download action group.
- Enter the Period Ending Date and optional G/L Account Filter in the Upload Parameters section (if not already entered), then click the Excel action.
- An Excel workbook is downloaded with one worksheet per dimension and account type. Sheet names follow the pattern
{DimensionCode} {PL MTD}and{DimensionCode} {BS YTD}. If Natural Acct Entity ID is configured, additional sheets namedNaturalAcct PL MTDandNaturalAcct BS YTDare included. Each sheet contains columns for G/L Account No., G/L Account Name, Dimension Value Code, Dimension Value Name, and Amount.
10. Verifying Submissions on the FloQast Web Site
Section titled “10. Verifying Submissions on the FloQast Web Site”After uploading trial balance data from Business Central, verify the submission in FloQast:
-
Log in to FloQast at https://app.floqast.com (or your region-specific URL).
-
Navigate to Trial Balance in the FloQast left-hand menu.
-
Select the entity that corresponds to the dimension you uploaded. Each configured dimension uploads to its own FloQast entity, so you will need to check each entity separately. If a Natural Acct Entity ID was configured, also check that entity for the dimension-free trial balance.
-
Select the period (month and year) that matches the Period Ending Date used during the upload.
-
Verify the uploaded data:
- Account numbers should include the dimension delimiter and dimension value code (e.g.,
4000|OPS,5100|ADM). Accounts with no dimension value assigned will show the account number only (e.g.,4000). - Account names should include the dimension name after the delimiter (e.g.,
Sales Revenue|Operations). - Balances should match the amounts extracted from Business Central:
- Income Statement (P&L) accounts: Month-to-date net change for the selected period
- Balance Sheet accounts: Year-to-date cumulative balance as of the period ending date
- Account numbers should include the dimension delimiter and dimension value code (e.g.,
-
Spot-check several accounts against Business Central reports:
- Run the Trial Balance report in Business Central for the same period and compare amounts.
- Verify that dimension breakdowns match by running the Trial Balance by Dimension or reviewing G/L Entries filtered by dimension.
What to Look For
Section titled “What to Look For”- All expected accounts are present — If accounts are missing, check the G/L Account Filter used during upload, and confirm accounts are classified correctly as Income Statement or Balance Sheet in the Chart of Accounts.
- Dimension values are correct — Each account should appear with the expected dimension value codes. Verify that the configured shortcut dimension slot matches the dimension you intended.
- Amounts are accurate — P&L amounts should reflect month-to-date activity; Balance Sheet amounts should reflect cumulative year-to-date balances.
- No duplicate or stale data — Since FloQast treats uploads as idempotent for the same entity and period, re-uploading will overwrite previous data.
11. Activity Log
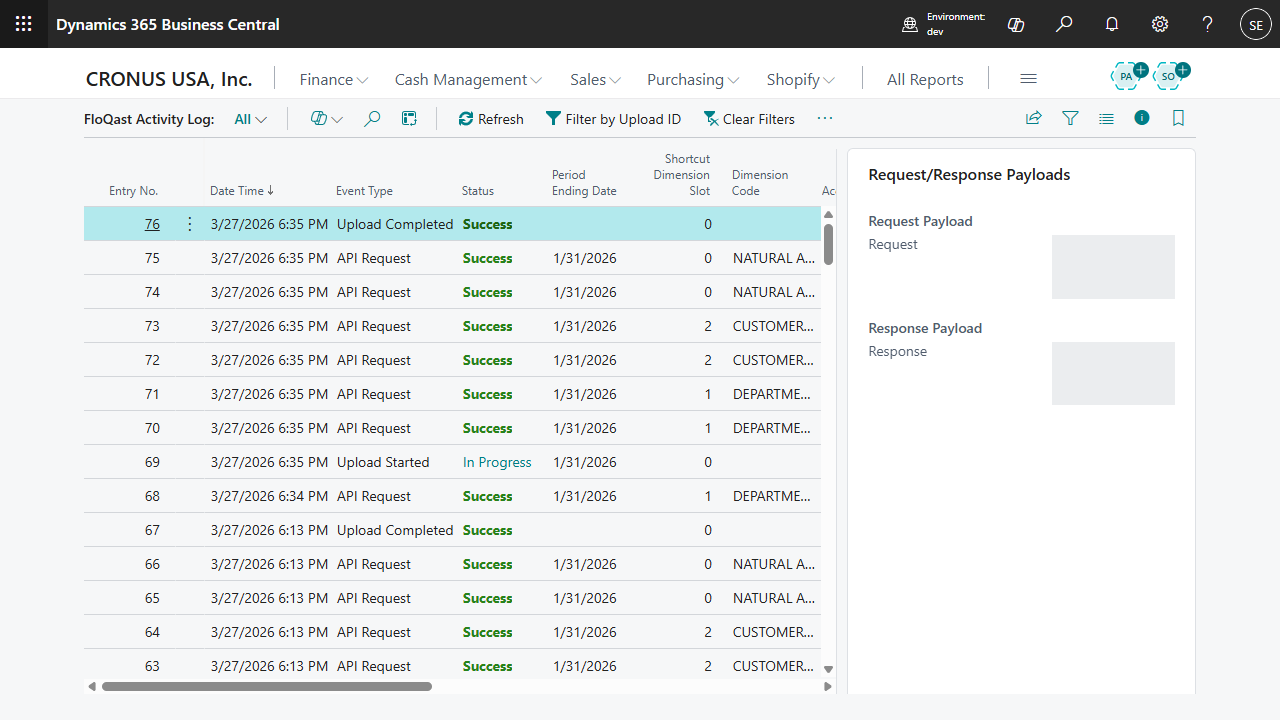
Section titled “11. Activity Log”The FloQast Activity Log provides a complete audit trail of all extension operations.
Opening the Activity Log
Section titled “Opening the Activity Log”- From the FloQast Setup or FloQast Upload page, click View Activity Log in the action bar.
- Or search for FloQast Activity Log in the Business Central search bar.
Log Entry Fields
Section titled “Log Entry Fields”| Field | Description |
|---|---|
| Entry No. | Sequential auto-incremented identifier for each log entry |
| Date Time | When the event occurred |
| Event Type | The type of event (Upload Started, Upload Completed, Upload Failed, Upload Skipped, API Request, API Response, Retry Attempt, Test Connection, Extraction Started, Extraction Completed, Diagnostics, COA Upload Started, COA Upload Completed, COA Extraction) |
| Status | Success, Failed, Partial Success, Warning, or In Progress |
| Upload ID | A unique GUID linking all log entries for a single upload operation (hidden by default — use column chooser or the Filter by Upload ID action to view) |
| Period Ending Date | The period being processed |
| Shortcut Dimension Slot | The dimension slot being processed (if applicable; blank for natural account uploads) |
| Dimension Code | The resolved dimension code |
| Account Type | P&L MTD or BS YTD |
| Record Count | Number of trial balance rows in the extract or upload |
| HTTP Status Code | The HTTP response code from the FloQast API |
| Retry Attempt No. | Which attempt number (1, 2, or 3) for retry scenarios |
| User ID | The Business Central user who initiated the action |
| Error Message | Error details if the event failed |
| Note | Additional descriptive notes about the event |
Request & Response Payloads
Section titled “Request & Response Payloads”Select a log entry and view the Request/Response Payloads FactBox on the right side of the page. This shows the full JSON request body sent to FloQast and the response received. Use this for troubleshooting API errors or verifying exactly what data was submitted.
You can also use the View Request Payload and View Response Payload actions in the action bar to open either payload in a full-screen scrollable viewer, which is easier for large payloads.
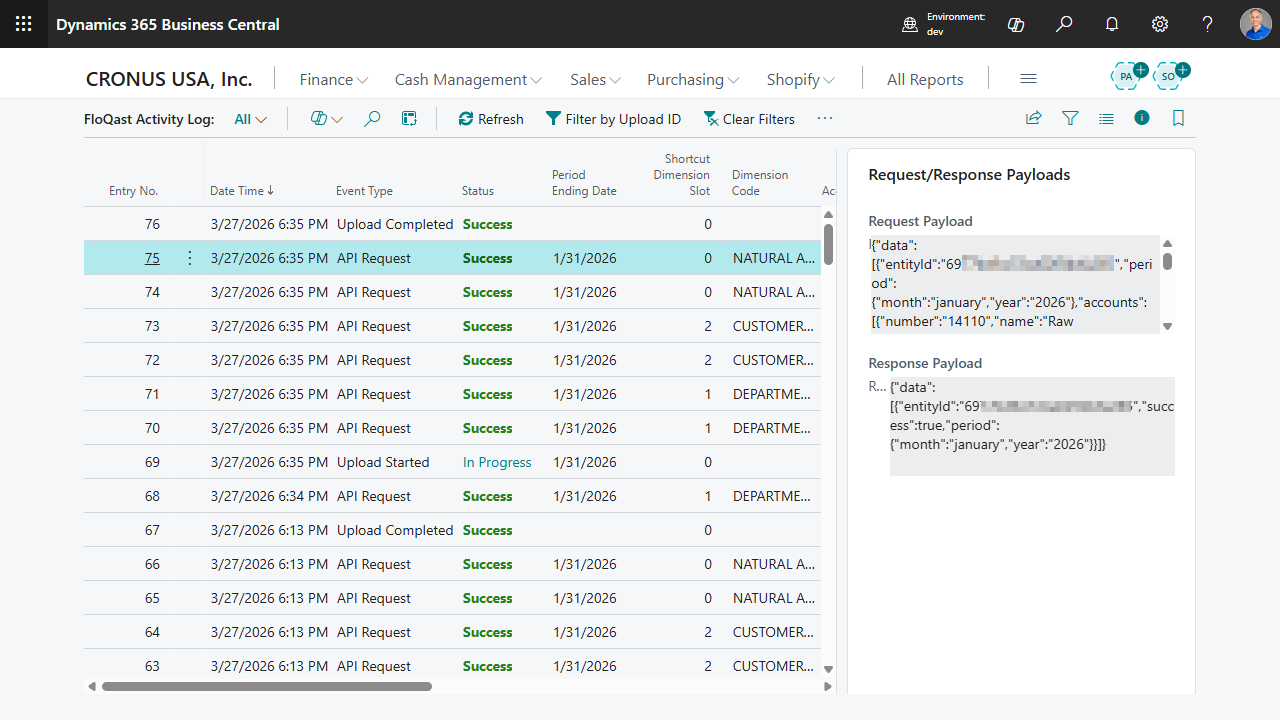
Filtering and Navigation
Section titled “Filtering and Navigation”- Refresh — Refreshes the log to show the latest entries.
- Filter by Upload ID — Filters the list to show only entries related to the currently selected row’s Upload ID. This is useful for isolating all events from a single upload operation.
- Clear Filters — Removes all filters and resets the view to show all entries.
- Use standard Business Central column filters to further narrow by date range, status, user, or event type.
12. Diagnostics
Section titled “12. Diagnostics”The FloQast Setup page includes a Run Diagnostics action that generates a comprehensive report useful for troubleshooting setup and data issues. When you run it, you are prompted for a Period Ending Date to use for the live extraction test.
The diagnostics report includes:
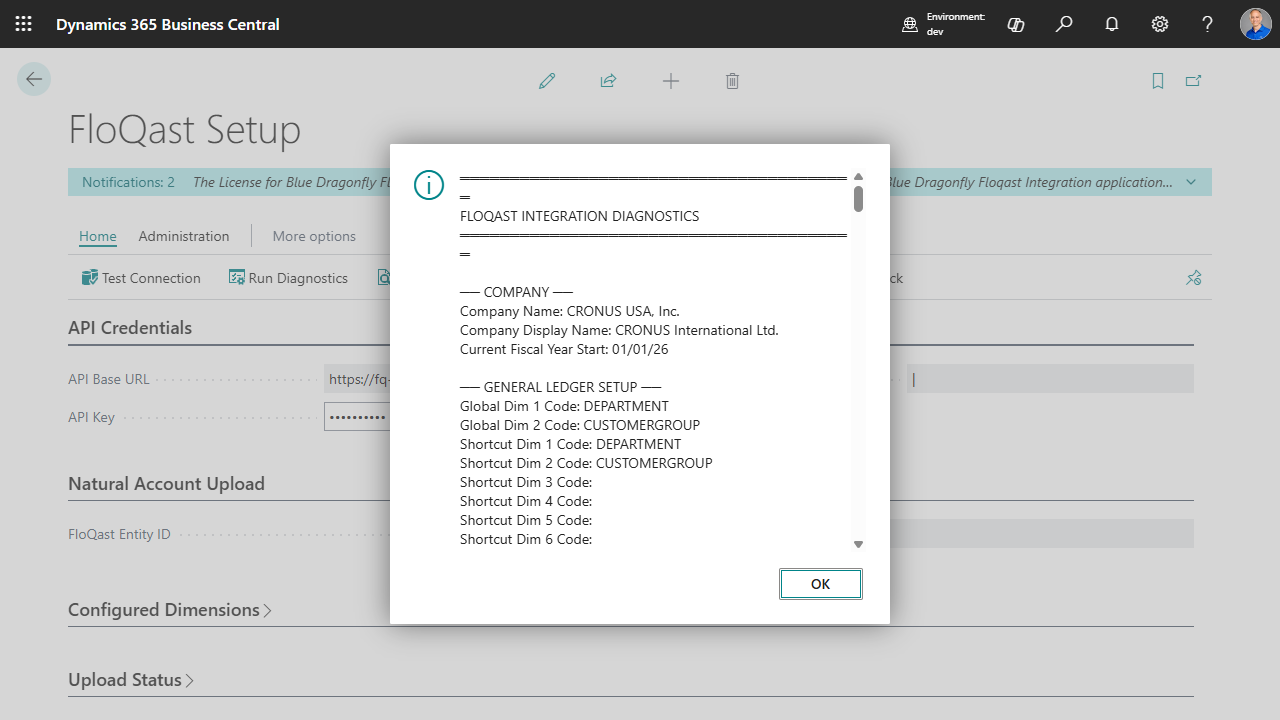
- Company information — Company name and fiscal year start date
- General Ledger Setup — All eight shortcut dimension configurations
- FloQast setup status — Delimiter, Natural Acct Entity ID, last upload status, upload lock state
- Configured dimensions — Each dimension slot with its resolved dimension code and FloQast Entity ID
- G/L Account classification summary — Count of posting accounts by Income Statement vs. Balance Sheet, plus heading, begin-total, and end-total accounts
- Income/Balance distribution — Account distribution by 2-digit account number prefix
- Suspect accounts — Accounts whose number prefix doesn’t match their Income/Balance classification (e.g., account numbers starting with 1 or 2 classified as Income Statement)
- Sample accounts — First 30 P&L and BS posting accounts for quick verification
- Live extraction test — Performs an actual P&L and BS extraction for the entered Period Ending Date to verify the extract logic is working correctly
Run the diagnostics if you encounter unexpected results or need to verify the account classification in your Chart of Accounts.
13. Chart of Accounts Upload
Section titled “13. Chart of Accounts Upload”13.1 Overview
Section titled “13.1 Overview”The Chart of Accounts (COA) Upload feature sends your Business Central Chart of Accounts to FloQast. Unlike trial balance uploads, COA uploads contain only account numbers and names — no balances or period data. This gives FloQast the account structure it needs for mapping and reconciliation.
COA uploads support the same entity configuration as trial balance uploads:
- Natural Account COA — Uploads G/L Account numbers and names (no dimensions) to the Natural Acct Entity ID.
- Dimension COA — For each configured dimension, uploads a cross-join of G/L Accounts × Dimension Values to that dimension’s FloQast Entity ID. Account numbers and names include the dimension delimiter (e.g.,
4000|OPS,Sales Revenue|Operations).
COA uploads are typically performed once during initial setup or whenever the Chart of Accounts changes (e.g., new accounts added, accounts renamed, new dimension values created).
13.2 Uploading from the Setup Page
Section titled “13.2 Uploading from the Setup Page”- Open FloQast Setup.
- Click the Upload Chart of Accounts action in the action bar.
- A confirmation dialog shows the number of entities that will receive COA data.
- Click Yes to proceed.
- The system extracts the COA for each configured entity and uploads it to the FloQast API.
- A summary message displays the result (success, partial success, or failure).
- COA upload events are recorded in the Activity Log with event types: COA Upload Started, COA Extraction, COA Upload Completed.
13.3 Uploading from the Upload Page
Section titled “13.3 Uploading from the Upload Page”- Open FloQast Upload.
- Click the Upload Chart of Accounts action in the action bar.
- Follow the same confirmation and review steps as above.
13.4 Previewing COA Data
Section titled “13.4 Previewing COA Data”The FloQast Preview page supports COA preview and test submission:
- Open the FloQast Preview page.
- Select a Dimension from the lookup (or leave blank/0 for natural account COA).
- Click the Retrieve COA action. No Period Ending Date is required for COA previews.
- Review the extracted accounts in the GL Data section. For dimension COA, each G/L Account appears once per dimension value (cross-join), or once per used combination when Used Combinations Only is turned on.
- The JSON Data section shows the COA payload structure (no
periodorbalancefields). - Click Submit COA to send the COA payload to FloQast for the selected dimension.
14. Troubleshooting
Section titled “14. Troubleshooting”14.1 Common Issues
Section titled “14.1 Common Issues”| Issue | Possible Cause | Resolution |
|---|---|---|
| Connection test fails | Invalid API key, wrong region URL, or network issue | Verify the API key in FloQast Admin → API Settings. Confirm the API Base URL matches your FloQast region. Check network/firewall rules. |
| ”API Base URL must use HTTPS protocol” | HTTP URL entered instead of HTTPS | Change the API Base URL to start with https://. |
| ”At least one Shortcut Dimension must be configured” | No dimensions added in setup | Add at least one shortcut dimension slot in the Configured Dimensions section. |
| ”Shortcut Dimension X is not configured in General Ledger Setup” | The slot number has no dimension code assigned in GL Setup | Go to General Ledger Setup → Dimensions tab and assign a Dimension Code to the shortcut dimension slot. |
| Upload returns HTTP 401 (Unauthorized) | API key is invalid or expired | Obtain a new API key from FloQast and update it in FloQast Setup. |
| Upload returns HTTP 400 (Bad Request) | Data validation error on FloQast’s side | Review the response payload in the Activity Log for details. Check that each dimension’s FloQast Entity ID (and the Natural Acct Entity ID, if configured) is correct and is a valid 24-character hex string. |
| Upload returns HTTP 413 (Payload Too Large) | Too much data in a single upload | Apply a G/L Account Filter to reduce the dataset size. For Chart of Accounts uploads, turn on Used Combinations Only in FloQast Setup (see Section 3.6). Also review whether all configured dimensions are necessary. |
| ”Upload Trial Balance” button is disabled | Upload lock is stuck from a previous failed upload | On the FloQast Setup page, use the Clear Upload Lock action (admin only) to reset the lock. |
| ”Upload is already in progress” | Another user has an upload running, or the lock is stuck | Wait for the active upload to complete, or use Clear Upload Lock if the upload is confirmed not running. |
| Missing accounts in FloQast | Accounts filtered out or misclassified | Check the G/L Account Filter used during upload. Verify account Income/Balance classification in the Chart of Accounts. Run Run Diagnostics to check for suspect accounts. |
| Amounts don’t match expectations | Wrong period or date logic misunderstanding | P&L amounts are month-to-date (Range mode); BS amounts are year-to-date (AsOf mode). Verify the Period Ending Date is the last day of the intended month. |
14.2 Upload Troubleshooting with Detailed Diagnostics
Section titled “14.2 Upload Troubleshooting with Detailed Diagnostics”When an upload fails and the standard Activity Log entries do not provide enough detail to diagnose the issue, enable Detailed Diagnostics for a richer view of what was sent to FloQast and what error was returned.
Step 1 — Enable Detailed Diagnostics
Section titled “Step 1 — Enable Detailed Diagnostics”- Open FloQast Setup (search bar → FloQast Setup).
- In the Diagnostics section, turn on Enable Detailed Diagnostics.
- Save/close the page.
Step 2 — Re-run the Upload
Section titled “Step 2 — Re-run the Upload”- Open FloQast Upload.
- Click Upload Trial Balance and complete the upload as normal — even if it fails again.
Step 3 — Find the Diagnostics Entry in the Activity Log
Section titled “Step 3 — Find the Diagnostics Entry in the Activity Log”- From the FloQast Upload page, click View Activity Log.
- In the log list, look for entries with Event Type = Diagnostics. There will be one Diagnostics entry per failed API call (one per failed dimension/account-type combination).
- The Status column will show Failed.
- The Error Message column shows the extracted API error text (e.g.,
API: "entityId" should be a valid Mongo ObjectId).
Step 4 — View the Full Diagnostic Data
Section titled “Step 4 — View the Full Diagnostic Data”-
Select the Diagnostics log entry.
-
On the right side of the page, the Request/Response Payloads FactBox displays two sections:
Section Contents Request Payload A formatted diagnostic report including: account type, dimension, period, record count, HTTP status, extracted API error, and a sample of up to 15 accounts that were sent (account number, name, dimension value, amount). Response Payload The raw response body returned by the FloQast API (e.g., the full JSON error object). -
Click View Request Payload or View Response Payload in the FactBox to open either in the full-screen viewer.
What to Look For
Section titled “What to Look For”| Symptom in Diagnostic Data | Likely Cause | Resolution |
|---|---|---|
"entityId" should be a valid Mongo ObjectId in response | Entity ID for the dimension is blank, wrong, or not a 24-character hex string | Open FloQast Setup → use Retrieve Entities action to get valid IDs, then paste the correct one into the dimension’s FloQast Entity ID field (or the Natural Acct Entity ID for natural account uploads). |
| HTTP Status = 401 in diagnostic | API key rejected by FloQast | Re-enter the API key in FloQast Setup. |
| HTTP Status = 400 with different message | Data format issue | Review the request payload sample accounts for unexpected characters or formatting. |
| Sample shows 0 accounts | Extraction returned no data for this dimension/account type | Check the G/L Account Filter and account classifications. Run Run Diagnostics from the Setup page. |
| Sample shows correct accounts but upload still fails | API-side issue | Copy the Response Payload and share with FloQast support. |
Preview Page API Log (Alternative Method)
Section titled “Preview Page API Log (Alternative Method)”For a faster feedback loop without affecting the full upload, use the FloQast Preview page:
- Open FloQast Preview, set your parameters, click Retrieve G/L Data, then Submit to API.
- The FloQast API Log section (and View API Log action) shows a
--- Diagnostic ---block containing:Entity ID (from Setup): "xxx"— exact value being sent (from the dimension’s FloQast Entity ID or the Natural Acct Entity ID), quoted so blank/whitespace is visibleEntity ID Length: 24— must be exactly 24 for a valid Mongo ObjectIdNumber Delimiter: "|"— the configured delimiterRequest Body: {...}— the first 500 characters of the actual JSON payload
This makes it easy to confirm the Entity ID and JSON structure before attempting a full upload.
14.3 Retry Behavior
Section titled “14.3 Retry Behavior”When a transient error occurs (HTTP 5xx or network timeout), the system automatically retries:
- Attempt 1: Immediate (no delay)
- Attempt 2: After a 5-second delay
- Attempt 3: After a 15-second delay
Non-retryable errors (HTTP 400, 401, 413, and other 4xx codes) are not retried. The Activity Log records each attempt separately.
15. Security & Permissions
Section titled “15. Security & Permissions”Permission Sets
Section titled “Permission Sets”The extension includes two permission sets:
| Permission Set | Caption | Purpose |
|---|---|---|
| FLQ Admin BLD | FloQast Admin | Full access to setup, upload, preview, diagnostics, activity log, and all configuration. Assign to administrators who configure the extension. |
| FLQ User BLD | FloQast User | Access to upload, preview, and activity log. Cannot access the Setup page or modify configuration. Assign to routine users who perform period-end uploads. |
API Key Security
Section titled “API Key Security”- The FloQast API key is stored in Business Central’s Isolated Storage with company-level data scope. It is not stored in a database table.
- The API key is never displayed in plain text on the Setup page — it is always shown as masked characters.
- The API key is transmitted to FloQast only in the
x-api-keyHTTP header over HTTPS.
Data Security
Section titled “Data Security”- All API communication uses HTTPS (TLS encryption). HTTP URLs are rejected by the setup validation.
- Full request and response payloads are logged in the Activity Log for audit purposes. Access to the Activity Log is controlled by the permission sets above.
- The upload lock mechanism prevents concurrent uploads from the same company.
For additional support, contact Blue Dragonfly, LLC at https://bluedragonflyllc.com/support.